Activity
Mon
Wed
Fri
Sun
Jul
Aug
Sep
Oct
Nov
Dec
Jan
Feb
Mar
Apr
May
Jun
What is this?
Less
More
Owned by Jim
Oasis Builders helps busy families grow healthy food, herbs for medicine, and gain calm confidence for everyday readiness.
Memberships
Real Food Family
30 members • $1/month
Faith & Flowers
16 members • Free
388 contributions to Oasis Builders
18h •
What Plants Want to Grow Here?
One thing I’ve learned building my food forest is that plant selection starts with the site—not the plant. For example, I didn’t start with serviceberry and build a row around it. I started with a location: • Moderately moist soil• Good drainage• Pond influence• Native ecosystem fit Then I looked for plants that naturally belong there. The result became a row built around: 🌳 Serviceberry🌿 Bayberry🍂 Spicebush Instead of asking: “What plant do I want?” I try to ask: “What plants want to be here?” I’ve found that question leads to better designs, healthier plants, and fewer future problems.

🔥
2 likes • 17h
Amen to nature. I noticed something similar recently in one of the rougher areas out front. For a long time, that spot was mostly rock and clay. It grew the usual weeds that can handle dry, compacted soil, like dandelion, plantain, and a few others. Since it sits right in front of the house, it also became a convenient place to drop truckloads of hardwood mulch over the last couple of years. I have also built several weed, hay, and mash compost piles there before moving that material around the property. To my wife, it still looked like a brown mulch work area, and she has been gently reminding me that it would be nice to plant something there. Yesterday was rainy but calm, so I sat on the porch and enjoyed the rain for a little rest and restoration. While I was sitting there, I looked over and noticed a dark green plant I had not seen there before. The app identified it as American black nightshade. Right beside it was another healthy volunteer that came up as Oriental lady’s thumb. These became clues because they were thriving. That sent me into a little more research. Black nightshade relatives often show up where there is fertility and moisture. Persicaria plants often point toward damp soil, compaction, or slower drainage. That does not prove everything about the soil, but it does tell me the area has begun its succession. What used to be hard clay and dry compacted weeds now has deeper mulch, more organic matter, better moisture, and enough life moving through it for a different group of plants to show up. Nature had already started the soil succession which made be look at that spot differently. Instead of seeing only decaying brown mulch, I am starting to see the next layer. It may become a good place for a small berry guild near the front of the house, where visitors could eventually grab a handful of berries on the way in. Sometimes the garden does not give us a finished design. It gives us clues. Our job is to slow down long enough to read them before deciding what comes next. All and all, a relaxing and fruitful day in the rain.
🔥
0 likes • 3h
@Sarah Peterson because of the sponge layer nature provides decaying matter at all stages at the same time... we use compost but that is completely decayed; my idea is the key is truly decaying material at all stages... most decayed compost next to the soil and then each layer up is a little less decayed to the last layer being fresh hardwood mulch.
🔥
3d •
Read the Soil Surface Clues
We have been talking about checking moisture before watering, usually down around 2 to 4 inches. That is a good habit to maintain, although as we move into the strongest sun and longest days of the year (summer solstice), there are also daily surface clues we can notice on our morning garden walks. The soil surface itself can teach us a lot. The surface takes the first hit from heat, hard rain, wind, and foot traffic. If it crusts over, water may start running off instead of soaking in. This tells us the surface structure is closing up. If it cracks open, the bed is telling us it has dried, tightened, and started pulling apart. This is most common in clay soil, especially when bare soil gets wet, then dries hard in the heat. If the soil under the mulch feels heavy, stays wet too long, or smells stale instead of earthy, it may need more air and less moisture. Roots need water, but they also need oxygen. If the mulch is thinning, the soil is slowly becoming more exposed to heat, evaporation, weeds, and pounding rain. At the same time though, if the mulch is disappearing, that can also be a good clue that worms, fungi, insects, and microbes are working it through. As organic matter becomes thin between plants, those open spaces become weak points in the garden bed. They lose moisture faster, heat up quicker, invite more weed pressure, and take the hardest hit when rain comes in fast. These are simple clues, but they teach us a lot about how the bed is functioning. We do not have to diagnose the whole garden at once, although it is important to notice these clues as they begin to appear so small corrections can be made before they become large issues. This week, pick one area and look closely at the surface. Lift the mulch in a few places, smell the soil, and look for crusting, cracks, worms, roots, dry pockets, soggy spots, thinning mulch, or bare patches. Then take one small action. Add a little compost or fresh mulch where the surface looks tired. Keep mulch pulled back from plant stems if the rain pushes it too tight. Gently loosen a sealed surface around the plants cultivating lightly to help water enter and air return.
🔥
2 likes • 2d
@Robert Chan At 4 inches, we want to know if the bed is building a living sponge. Is there steady moisture below the surface? Does the soil crumble, or does it smear like paste? Does it have air space, or is it tight and sealed? Does it smell earthy, or does it smell stale and sour? Are there fine roots, worm channels, fungal strands, or signs that life is moving through that layer? That lower layer tells us whether water is soaking in and being held, or whether the top is just getting wet while the soil underneath stays hard, dry, compacted, or airless. In clay soil especially, the biggest issue is not usually nutrient holding. Clay can hold a lot. The issue is that the particles are so small that, without aggregation, there is not enough room for air. So the 4-inch check is really a health check on the sponge layer. If that layer has moisture, crumbs, air, roots, and an earthy smell, the soil system will support life. When we do a composition test, we will check sand, organic matter and clay getting a % of each to help set out direction. Another thing to watch for of it begins to grow a little higher, is what weeds are growing. Nature many times will give us clues to soil condition and what other plants will grow in the space. Do you have an idea of what you want to grow?
🔥
0 likes • 15h
@Jon Shobe Species does have an effect although my understanding is its more of how the grass is maintained. Grass feeds its roots through its leaves. More leaf blade means more photosynthesis, more sugars, more root growth, better drought tolerance. Keeping grass short weakens its ability to keep feeding the root system. When grass is kept very short all season, the plant has less leaf area, so it usually maintains a smaller root system and consequently shallow biology. Taller grass encourages deeper roots, better drought resistance, fewer weeds, or better stress tolerance because the biology deepens. The ability for moisture to go deeper and leaf size promotes deeper roots and deeper biology.
🔥
1d •
What does regenerative mean to you?
That word gets used a lot, and it can mean different things depending on where someone is standing. For me, regenerative starts with one question, "Is this system gaining life over time?" Is the soil becoming more alive? Is water soaking in better? Are roots going deeper? Are worms, fungi, insects, and birds showing up? Is the garden becoming less dependent on constant rescue? In a backyard, regenerative does not have to mean a perfect system. It may start with one covered bed, one compost pile, one perennial plant, one pollinator patch, or one family learning to observe before reacting. When you hear the word “regenerative,” what comes to mind first?
Poll
10 members have voted
🔥
0 likes • 17h
@Betsy Moll Diversity and stability... right on
🔥
0 likes • 17h
@Jon Shobe Yes Sir... nature's cycles
🔥
3d •
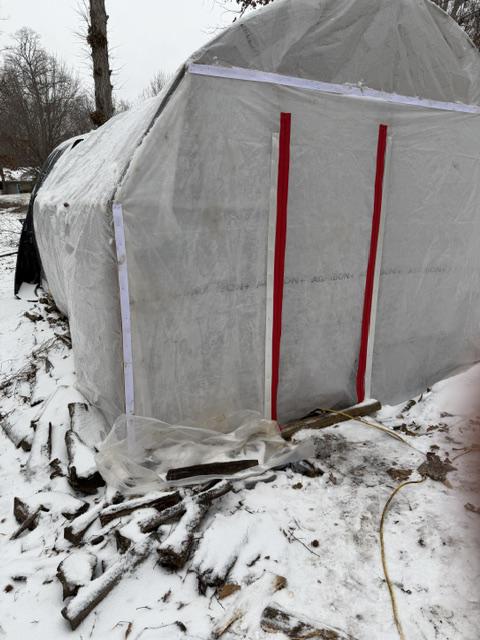
How I Built and Use My Cattle Panel Poly Tunnel
I built my poly tunnel from cattle panels, and it has been one of the more useful experiments on the homestead. I used 16-foot cattle panels and arched them across a 12-foot span because that is what my space allowed. If I had more room, I may have gone closer to a 14-foot span because it would give a little more growing width while still leaving plenty of headroom. The tradeoff is that a wider span lowers the center height. The 12-foot span worked well for my bed layout. A person can usually reach comfortably into a 32-inch bed when there is access from both sides. With 24-inch walkways, the layout works out like this: 32-inch bed, 24-inch walkway, 32-inch bed, 24-inch walkway, 32-inch bed. That equals 144 inches, or 12 feet. In real life, I would still leave a little room for posts, side rails, plant growth, straw bale insulation and general working space. This simple layout worked out well. With the 12-foot span and roughly 5-foot side walls, the center height is close to 9.5 to 10 feet, depending on how the panel bends and where it is fastened. With the same side wall height, a 14-foot span would be closer to an 8-foot center height. That would still be enough headroom and would give a little more floor or straw bale space. There are several ways to build a cattle panel poly tunnel, and some are much more permanent than others. Mine was built as a one-man, lower-cost experiment, not as a finished commercial greenhouse where I arched the panels from one side to the other. Another way would be to run the panels lengthwise with a pitched roof. In the design, the north wall can be more solid, act as an insulator and a wind break. I have seen people use straw bales along the north wall for insulation, water barrels with aquarium heaters or solid construction with insulation. For my first build, I used 7-foot T-posts so I could get about 5 feet of side wall height. I placed 1 1/4-inch PVC tees on top of the posts, then ran 3/4-inch EMT conduit through those tees as the side rail. The ends of the cattle panels were then wired to the EMT with wire bag ties.
🔥
1 like • 2d
@Dar Brown I'll upload what I have although tomatoes blocking most... I'll get some pics this autumn.
🔥
1 like • 2d
@Phillip Greenwood Rule of thumb is about 10% less per sheet although depends much on plastic quality. I use some artifical lighting in early season for starts on cloudy days or short sun hours.

6d •
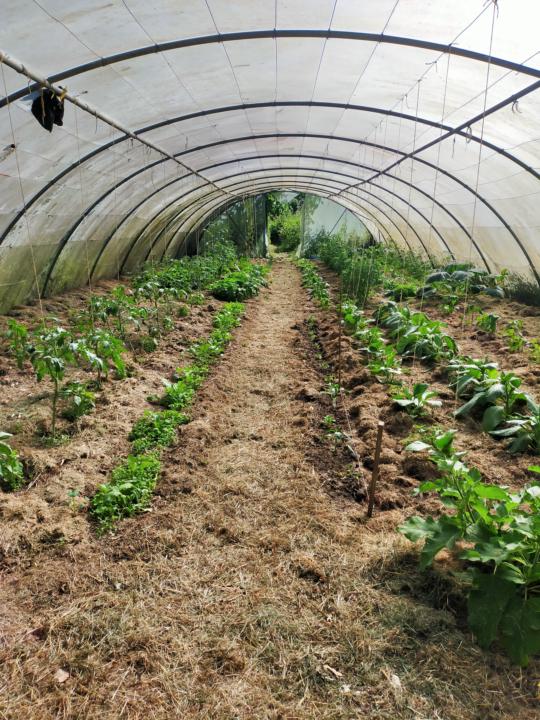
Polytunnel climate
We have discussed protected growing environment issues, like water , mulch, ventilation and area, here is some figures from the end of a hot day , mid June at 18h in the evening. Last watering 20 hours ago and under the grass mulch it's still moist.(Total area 100sqm). Amount of water given 220l by watering can. Daytime temperature 30 degrees Celsius. Temperature now inside the tunnel 28 degrees. Temperature outside only two or three degrees less. Conditions of tomato plants, slightly wilting. Soil temperature 23 degrees . I would consider this to be adverage in all aspects, and the performance of the environment, to me , seems good. No disease, or pests and steady uniform growth, could be a little more advanced in growth, but the plants were small when planted and it was quite late (21 days ago)up to the last frost date.
🔥
0 likes • 3d
@Phillip Greenwood Do you typically water in the evening?
🔥
0 likes • 2d
@Phillip Greenwood sounds like a good plan
1-10 of 388

🔥
@james-flach-4044
Off-grid dad turned healthcare builder and disaster planner, now sharing calm, practical ways to grow food, use herbs, and build family readiness.
Active 2h ago
Joined Dec 22, 2025
ENTP
Cookeville, TN 38506