Activity
Mon
Wed
Fri
Sun
Jul
Aug
Sep
Oct
Nov
Dec
Jan
Feb
Mar
Apr
May
What is this?
Less
More
Owned by Matthew
Practical AI training for work and life. Hands-on lessons with Claude, ChatGPT, and automation tools. Built for people ready to use AI.
Memberships
AI Bits and Pieces
744 members • Free
AI Automation Society
388.2k members • Free
Skoolers
183.5k members • Free
156 contributions to AI Bits and Pieces

🔥
1d •
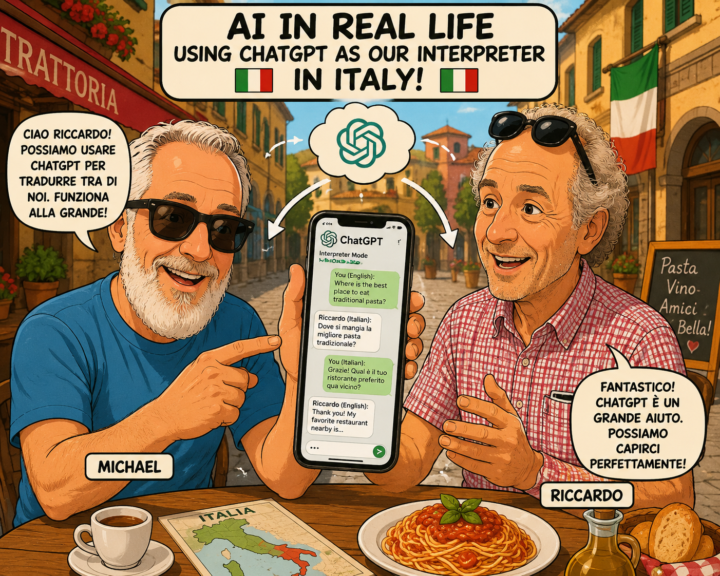
AI in Real Life: ChatGPT Became Our Family Interpreter 🇮🇹
One of the most unexpected uses of AI during our trip to Italy wasn’t coding, content creation, or business strategy. It was family. My wife’s cousin, Riccardo, speaks Italian. I speak English. Other family members fall somewhere in between. Some speak only Italian. Some speak a little English. Some know just enough of the other language to get by. After arriving in Italy, I realized ChatGPT could help. So I created a simple custom instruction: “We are visiting Italy and do not speak Italian fluently and need a translator. If you hear someone speaking English, translate to Italian. If you hear someone speaking Italian, translate to English.” That was it. Then I opened Voice Mode. I would speak English. ChatGPT would translate it into Italian. Riccardo would respond in Italian. ChatGPT would translate it back into English. Suddenly, more people could participate. Stories were shared. Family history was discussed. Jokes landed. Questions about ancestors and life in Italy were answered more clearly. It was not perfect. In poor cell areas, it struggled. When we hit Voice Mode limits, the translation stopped. Sometimes the flow broke. But even with those limitations, the overall experience was a huge net plus. The other unexpected benefit was context. Every conversation started in a different chat. But after a few days, ChatGPT had helped capture enough context around our family ancestry, our kids’ life journeys, family relationships, and stories from Italy that each conversation became more meaningful. After one conversation, I was even able to create a family tree. That was amazing. It was not just translating words. It was helping preserve the story. The result was not seamless technology. It was practical connection. In a small mountain town in Italy, surrounded by family, history, great food, and generations of stories, ChatGPT helped bridge a language gap that had existed for years. When people talk about AI, they often focus on productivity, automation, coding, or business transformation.

3 likes • 1d
The family tree exploration is brilliant. You went to Italy expecting a translation hack and came back having recorded your family's actual history. Riccardo's stories, the ancestry, the kids' journeys. That's a different thing entirely. What I like is that it kept getting better as it went. Fresh chat every time, but a few days in it knew the relationships and the history well enough that the conversations had real weight to them. And it wasn't a complicated build. One instruction and Voice Mode. People who wanted to talk to each other finally could. Sounds like a hell of a trip. Mountain town, the food, family around the table. Perfetto is right @Michael Wacht! Thank you for sharing this, your beautiful family, and this amazing journey.
3d •
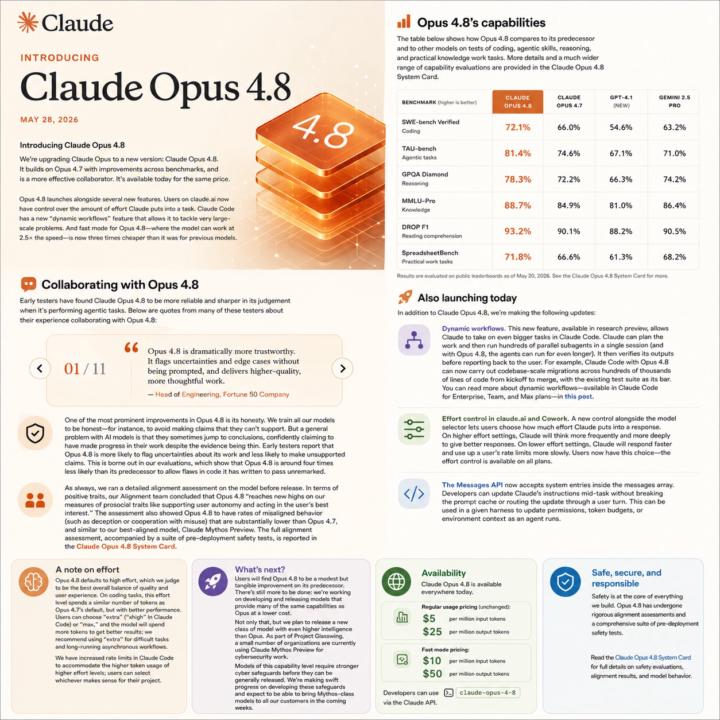
Introducing Claude Opus 4.8
Opus 4.8 dropped this week. Spent some time with the notes. Here's what actually changes day-to-day if you live in Claude Code. Longer independent work This is the one I care about most. Hand off a feature, a migration, or a bug sweep and Claude follows the thread through to completion. Sessions can be scoped bigger. Fewer handoffs, less context reloading. Parallel subagents with self-verification (research preview) Claude can spin up hundreds of subagents in one session and verify its own work before reporting back. I already run a critic pattern on most builds (draft, red-team, polish). Having that behavior native means less prompt scaffolding for the same outcome. Fast mode (research preview) Same model, roughly 2.5x speed, 3x cheaper than before. This changes the economics. Batch jobs I would have skipped on cost or time now make sense. Session summarization, repo scans, content batch runs. All in play. Effort control on claude.ai A knob for how much thinking goes into a response. Useful when you know the task is heavy or light and want to control the trade. Same price for the base model. Live today on claude.ai, the platform, and the major clouds. What I'm testing first: a multi-file refactor in one session to see how far it gets before I have to step in. Will report what I find. Attached: Opus 4.8 full story.
1 like • 3d
@Michael Wacht loving it!
🔥
4d •
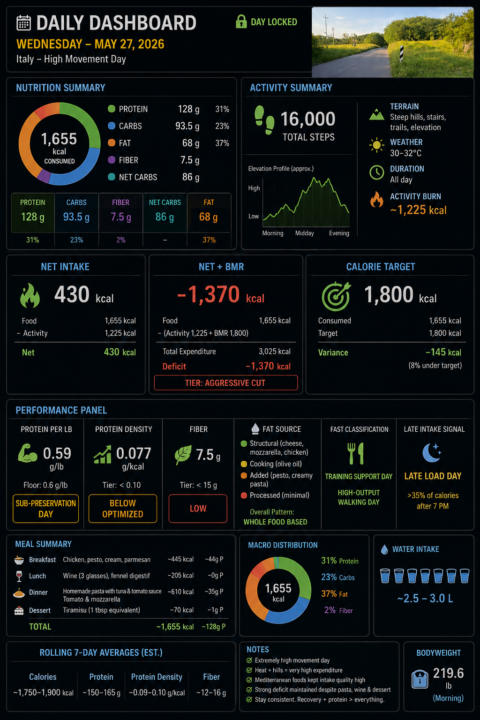
📊 AI in Real Life: My Personal AI Health Dashboard
One of the most practical AI systems I use every single day has nothing to do with coding, agents, or automation workflows. It’s my personal nutrition and activity tracker and daily dashboard. I log the food. I log the activity. ChatGPT does the rest. Every day: I log food, activity, bodyweight, and water as it is happening. ChatGPT estimates activity burn, subtracts it from my food intake, and then factors in my BMR to show whether the day is trending toward maintenance, fat loss, or an aggressive calorie deficit. Then, at the end of the day, it turns the raw inputs into a dashboard showing calories, macros, activity burn, net calories, net + BMR, protein density, protein per pound, fiber tier, fat-source patterns, etc. Because I follow a higher-protein diet, I also created a metric I call Protein Density: Protein grams ÷ total calories consumed (by snack, meal, day). The metric is useful because I can monitor food quality as I eat throughout the day, not just total calories. A good Protein Density score is: 0.10 or higher That generally means the day is optimized for muscle preservation and fat-loss efficiency. A lower score around: 0.05 That usually signals a less efficient nutrition day where calories are climbing faster than protein intake. For example: Chicken Breast (100g cooked, skinless): - ~165 calories - ~31g protein 31 ÷ 165 = 0.19 Protein Density Compare that to potato chips: Potato Chips (100g): - ~536 calories - ~7g protein 7 ÷ 536 = 0.01 Protein Density Both are food. But one is highly protein-efficient, while the other is primarily calorie-dense with minimal protein value. That simple ratio gives me immediate feedback on whether my meals are supporting my goals before the day is even over. The key for me is context. A 1,600-calorie day means one thing if I barely moved. It means something very different after 16,000 steps, hills, heat, and a high-output activity day. That is where AI becomes useful. Not just tracking data.
1 like • 4d
@Michael Wacht Brilliant!

🔥
26d •
Boost this shit ...
I have just published my next LinkedIn post and would really appreciate your support with a like. Every like helps make the topic more visible:branding, AI automation, and opportunities for SMEs. Here is the link to the post: https://www.linkedin.com/posts/holgerpeschke_branding-kiautomatisierung-mittelstand-share-7458048383899811840-TVlR?utm_source=share&utm_medium=member_desktop&rcm=ACoAACNevDoBIzJNI5MdjNG1E4nJtpWRYuk91yQ Thank you very much for your support.

0 likes • 4d
👊🏻

9d •
(Re) Introduce myself
Let me introduce myself.....apologies if I've already done and this will be a re introduction but here goes I am Shuaib, software engineer with over a decade's experience in the industry. Build many internal Web, Desktop and Mobile Apps - this includes websites, complex web apps, crms, gui, form apps, spreadsheets to android and maui mobile apps using a variety of techniques and languages. Tbh the list is too long but it's tools, skills and experience that will always be with me. Looking back I've also had an amazing opportunity to learn from VERY talented professionals from engineers to designers to managers and jacks of all traders across Health, Gov, Finance, Banking and Private industries. Now it's time to pick up tools in the world of ai.... I am so excited 😊 and can't wait to interact more with ALL of you!
1 like • 4d
@Shuaib Masoud Welcome! I expect you'll do extremely well.
1-10 of 156

@matthew-sutherland-4604
AI Automation Architect @ ByteFlowAI | Skool Community Owner of “AI for Life” (Claude.ai, CoWork, Claude Code).
Active 2h ago
Joined Dec 14, 2025
Mid-West, United States
Powered by