
Write something

Feb 2 •
Let’s talk off-camera flash for outdoor photography ☀️⚡️
Did you know that even in harsh sunlight, you can still get beautiful photos? You don’t have to be locked into golden hour to create great work. Learning how to use off-camera flash outdoors will: - Help you retain blue skies (no blown-out backgrounds) - Give you control over contrast and shadows - Free you from scheduling shoots around a tiny time window And here’s a big misconception I hear all the time:👉 You do NOT need a softbox to get soft light. I’ve done this successfully with softboxes and with a bare bulb flash. Softness is about distance, angle, and balance, not just modifiers. Two ways to balance bright daylight: - ND filter (my personal preference) - High Speed Sync (HSS) if you don’t have an ND How to achieve this look (simple setup): 1. Expose for the background first 2. Position the sun 3. Place your flash 4. Bring in the flash My typical starting point: - ISO: 100 - Aperture: based on how creamy I want the background - Shutter speed: 1/250 (because I’m using an ND filter) - Flash power for these shots: 1/4 power Once the background is dialed in, place your subject and fine-tune flash power. That’s it. You don’t need a ton of classes or fancy gear—just an understanding of light direction, balance, and control. If you want, next we can break down: - Bare bulb vs softbox pros & cons - Flash placement diagrams - Troubleshooting harsh shadows Drop questions below 👇
0
0

Jan 19 •
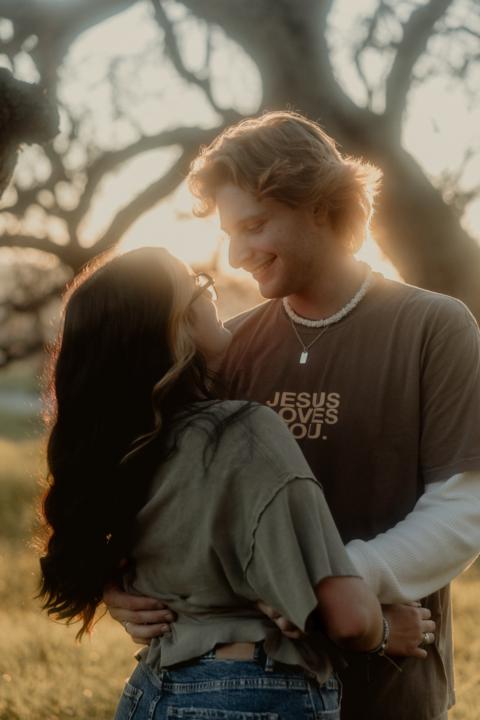
Posing and Direction
Yesterday I went out on a shoot with a young couple. The girl happens to be my neighbor, and her boyfriend is heading off to join the Coast Guard in just a few weeks. She wanted photos before he left and sent me a mood board filled with soft, dreamy images. A little backstory on my neighbor: she’s absolutely beautiful… but also incredibly shy, awkward, and easily embarrassed in front of a camera. This is where directing poses really matters. When someone is nervous, you have to pause and scroll through the images you’ve already taken so you can guide them. Sometimes directing means gently showing them what’s not working. In this case, she told me she didn’t know how to fix what she was doing. So I did something simple but effective: • I mimicked the exact head position she was doing when she got nervous • Showed her how to reposition her head • Pulled out her mood board and reminded her what she was asking for That visual connection helped. The funny part? I’ve known this girl since she was three years old, and she has never been embarrassed around me… until I pick up a camera 🤦🏻♀️ And remember how I typically say I don’t “spray and pray”? Well… there are exceptions. Some people get so nervous that you do need to take a few extra frames just to let them settle into the moment. That’s how you capture the magic after the nerves calm down. The last image I shared is the nervous shot—and it’s a perfect reminder that patience and guidance matter just as much as technical skill. 💡 Takeaway: Your job isn’t just to shoot—it’s to coach, reassure, and translate a vision into something your client can actually do.
0
0
Jan 2 •
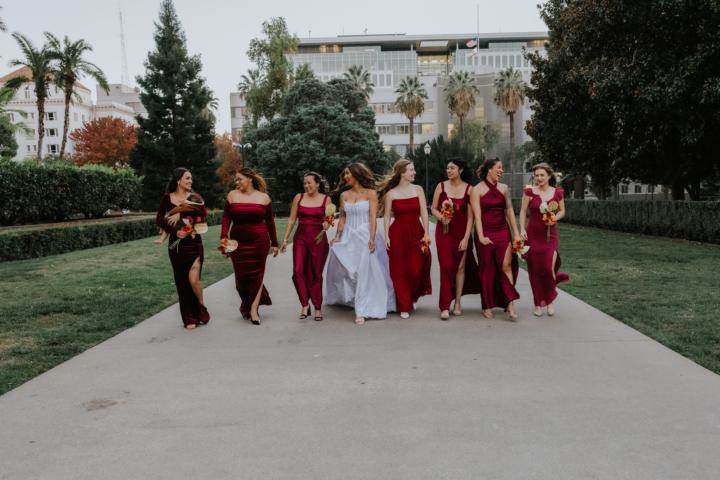
Wedding Photography
Are you thinking about becoming a wedding photographer? Let’s break that down for a moment. I’ve been shooting weddings for quite a while, and there are times when I bring on second shooters to capture moments I physically can’t be in two places at once. Weddings are fast-paced, unpredictable, and truly run-and-gun environments. You cannot control the lighting, you often can’t use flash, and your lighting conditions can change dramatically from one direction to the next—sometimes in seconds. Unless you live somewhere that’s overcast 90% of the time, you’ll be adjusting your settings constantly throughout the day. I’m not a “spray and pray” photographer. There’s nothing wrong with that approach—it’s just not how I work. When I photograph a wedding, I typically deliver 75–85% of the images I shoot, and for smaller weddings, that percentage is often even higher. When reviewing images from many second shooters, I often find that only 15–20% are usable. The most common reason? A lack of understanding of camera settings and lighting. I frequently see auto ISO left on, which becomes a problem when moving from bright outdoor light to shaded areas or under canopies—resulting in entire sections of unusable images. In many cases, it’s clear the photographer doesn’t fully understand the exposure triangle, and that can be incredibly frustrating. That said, I do have a few photographers I trust and regularly work with because they do understand their gear—and I tend to stick with them. If weddings are something you truly want to pursue, knowing your equipment inside and out is non-negotiable. This is where I can help. Practice is the only way to truly learn, but I can offer guidance and exercises to help you practice run-and-gun shooting without the risk of ruining someone’s once-in-a-lifetime wedding day. If you’re serious about growing, learning, and doing this the right way—there is a path forward.
1
0

Jan 2 •
Any gear is good gear. True and False!
A friend once told me, “Any gear is good gear!” And I would say this can be true — but let’s take a step back to determine what your goals are. What is it you’re trying to capture? 💡 The Real Deal: Jen and I both started with what we had. No fancy rigs, no massive budgets — just a love for visual storytelling. And trust me, that’s exactly where you should begin. The truth is GEAR CAN MATTER! What are you capturing? Because the right tools help you tell the story in the right way. 🎥 For example in videography: • Weddings? → Are you capturing “content” for the wedding, or are you capturing “a cinematic story”? Content means a phone is probably fine. But what if you want to capture a cinematic story? Well that’s going to require something like a gimbal for smooth flowing shots and a camera that can shoot 24FPS (frames per second) for a cinematic look along with the ability to capture LOG footage for the most dynamic range when coloring in post. You will also want a nice lens and possibly the ability to shoot in 120 FPS for beautiful slow motion. • Music videos? → you probably want cinema quality gear or something handheld with dramatic lighting and bold angles, maybe you want to use a fog or haze machine to add a level of intensity to your shoot. • Documentaries? → Lighting (maybe 3-point lighting setup, but definitely a key light) DSLR camera with the a high quality lens, and great audio capture. 🧠 Here’s the mindset: • If you don’t have all the gear mentioned above then start with what you’ve got. You may be surprised what your current gear can do if you really learn how to use it. • Learn the fundamentals: composition, lighting, framing, movement. • When you’ve mastered what you do have, then start building your kit with intention. • Each piece of gear should be able to capture your vision and should be something you’ll use. (trust me, We’ve made the mistake of spending $$$ on things we thought we would need only to discover we never used it outside of making sure it works. 😩
1
0
Dec '25 •
Bad Lighting + Your Camera = Horrible Footage!
Lighting can make or break your video. Whether you're shooting inside, outside, or somewhere dark, bad lighting can mess up an otherwise great shot. Here are some common lighting problems you’ll run into—and how to fix them. 1. Low Light Environments - Issue: Grainy footage, loss of detail, poor focus. - Fix:Use fast lenses (with wide apertures like f/1.8 or f/2.8).Increase ISO carefully to avoid noise.Use portable LED lights or on-camera lights.Stabilize your camera for longer exposure times if needed. 2. Harsh Sunlight Outdoors - Issue: Overexposure, harsh shadows, and blown-out highlights. - Fix:Use ND (neutral density) filters to reduce light entering the lens.Shoot during golden hour (early morning or late afternoon).Use reflectors or diffusers to soften shadows. 3. Mixed Color Temperatures (Indoor + Outdoor Light) - Issue: Inconsistent white balance and unnatural skin tones. - Fix:Set a custom white balance based on your primary light source.Use gels to color-match artificial lights.Turn off competing light sources when possible. 4. Backlighting - Issue: Subject appears too dark or silhouetted against bright background. - Fix:Use fill light or bounce light to illuminate the subject.Increase exposure slightly while keeping highlight details in check.Use a reflector or white surface to bounce natural light onto the face. 5. Flickering Lights - Issue: Certain indoor lights (like fluorescents or LEDs) flicker at high shutter speeds. - Fix:Match your camera’s shutter speed to the local electrical frequency (usually 1/50 or 1/60).Avoid slow-motion under artificial light unless you’ve tested for flicker.Use high-quality, flicker-free lighting equipment. 6. Flat Lighting - Issue: No depth or dimension in the scene; looks dull or lifeless. - Fix:Use three-point lighting: key light, fill light, and backlight.Position lights at angles to create shadows and depth.Adjust light intensity and placement to shape the subject’s features.
1
0
1-7 of 7
powered by

skool.com/level-up-visual-imagery-8955
A vibrant community for photographers and videographers to learn, grow, share, and master their craft - TOGETHER!
Suggested communities
Powered by