Activity
Mon
Wed
Fri
Sun
Jul
Aug
Sep
Oct
Nov
Dec
Jan
Feb
Mar
Apr
May
Jun
What is this?
Less
More
Memberships
CG Python Academy
1.3k members • Free
6 contributions to CG Python Academy

Aug '25 •
Attribute Editor Menu Add-on complete
After 2 and a half months, despite coming into this with zero python knowledge, with help from members of this community and chatgpt, I've finally made an add-on that makes it so you can edit mesh attributes with less clicks. Check out the trailer for it, download it and try it out. Also feedback would be neat too!

1 like • Aug '25
Fixed it, I edited my message to have the not bugged version.
1 like • Aug '25
@Victor Stepanov No not really, but I do have ideas to expand the add-on, like support for more datatypes, and like an ability to rename a property's label.
Aug '25 •
Help debugging my addon
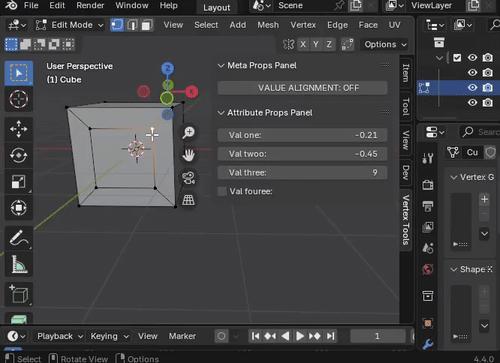
Hey its been a while, but I have been spending that time modifying my add-on a lot. I would like for you guys to download the add-on and see if there are any bugs or any other funny stuff going on. V-------------------------------------------------------------------------------------------------------------------------------------------------------------- What is the addon? The addon is an attribute editor menu, making it so that you can edit attribute values all in one place without going to Mesh > SetAttribute every time you want to edit a single attribute value. Saves time and reduces clicks. How to download it: Download the attached ZIP file, once you have done so go into blender Preferences > Get Extensions and in the top right hand corner there should be a down arrow. Click it then click on "Install from Disk" and select the addon zip and restart Blender. How to use it: - Once installed open the side bar or press N and you should see a tab called "AttributeMenu". - In "Attribute Props Panel" click on "add new attribute". - There you can select from a list of attributes. If you don't have any attributes, go to the properties panel and go to Data > Attribute and create a new attribute. - When you select an attribute from the list of attributes, you'll be able to see and edit it in the "Attribute Props Panel" Make sure that the attribute data type is either an int or bool or float data type, otherwise it wont work (I am planning to add support for different data types in the future). If you don't see the attribute in the property panel then its is likely in a different domain. So if you add an attribute, which domain is in face, but you are in vertex mode, just make sure to go to face select mode, and you should see the attribute in the panel. ----------------------------------------------------------------------------------------------------------------------------------------------------------------- Like I said I would like help debugging and finding errors and bugs n stuff, also new ideas on how to improve the addon would be greatly appreciated as well!
0 likes • Aug '25
@Christian Coppes I kinda understand how to check for which selection mode you're in as I have a function for that, but how would I grey out an individual property yet have others not be greyed out?
0 likes • Aug '25
@Christian Coppes So if I'm getting you correctly I could do take one of my property functions, like BoolProperty, which currently look like this: value_bool: BoolProperty(update=update_item_value) # type:ignore and do something like this? value_bool: BoolProperty(update=update_item_value, poll = lambda self,obj <bool statement>) # type:ignore If that's so I'll try it out. Its just that in the documentation, there's no "poll" that can be placed in the parameters of the property function, that's why I am a bit confused. Maybe it can still be done? idk :^
Jul '25 •
Vertex attribute editor
So for like the past month and a half I've been trying to create a menu that can edit all your custom attributes. And with the help of @Victor Stepanov, @Christian Coppes and a little bit of chat gpt, this is what I was able to do it. I wanted to not only showcase what I've done, but ask for a code reveiw because I feel like there is a bit more that could be optimised and I just wanted to see if there is anything worth improving. Like for instance I think in lines 119-122 and 223-226 I think that if you have a ton of attributes you want to create a property for, you could run into an issue where that section of the code takes up 15 lines instead of like the, so far, managable 4 lines. Attached is the script as well as a short gif demonstrating what it does. Tysm
0 likes • Jul '25
Try and see if you can run it from VSCode and if that doesn't work, run it via blender's script editor (and ofc add the "if __name__ == "__main__":" statement for the register function). If that doesn't work then I don't know what else to do since it seems to work fine on my end. A little more detailed explanation of the script, is that it basically creates attributes(img1 and 2), which you can edit via the 3D viewport side menu thingys(img3). Though you can edit and set attribute values in blender, you have to do so with multiple clicks. So instead of going to Properties > ObjectDataProperties > Attributes, clicking on the attribute, then having to go to Mesh > SetAttribute, and having to repeat those instructions, every time you want to change an attribute value, instead of that, you have them all layed out in front of you and edit the values as much as you want with significantly fewer clicks. If you want to add more attributes all you have to do is go into the script and essentially add like 2-3 lines of code to add a new attribute. I hope that explains how it works if not just lemme know!
0 likes • Jul '25
@Christian Coppes I did not know about the Modifier Tool thing, I'm definately going to check that out. I might even go onward with changing attributes in that way instead of my current python script. Talking about the python script. Yeah I need to fix that it doesn't work when there is a multiselection without an active vertex. I think its possible I just need to crack down and fix that. But yeah I'll look into the node editor way of editing attributes via menu. Thanks for this mate!
Jul '25 •
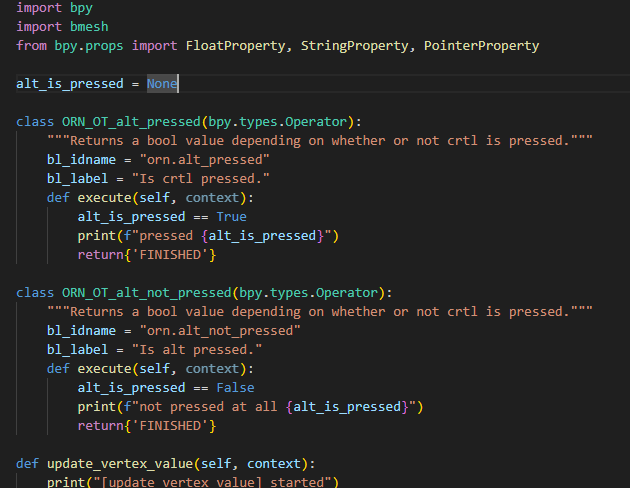
How to set boolean in operator
I have got this boolean that has an operator that'll change its value depending on whether or not the Alt key is pressed. There are two operators, one that'll execute when the alt key is pressed down and another one that'll execute when the alt key is released (img1&2). The issue is that these operators don't seem to be changing the value of the boolean. They execute but don't change the "alt_is_pressed" boolean variable. I feel like I am missing something very simple and basic, or I need to change my approach, but I'm not sure what is missing and what other way to approach this. The reason I have this operator is so that change the way the a vertex float changes its value. If alt is pressed the value of all selected vertices will equal the active selected vertex value. If alt is not pressed all selected vertices will equal their own value plus the difference from the previous value. So, if a value was 1 then it was changed to 3, the difference would be 2 so each selected vertices will equal its self plus 2. So, the vert with 0.2 will now equal 2.2, the one with 0.5 will equal 2.5 etc.(img3) Any help would be greatly appreciated. I included the code along with the images in case you want to go in and edit some things yourself.
0 likes • Jul '25
I decided to alter how the alt thing works. Instead of holding alt to make the bool true, you just tap alt to toggle it to be true or false, depending on the state the bool is currently in. That stops any weirdness from alt tabbing, and that makes it so I don't have to look for any alternative button. However, the main flaw is that I now need to find a way to show that bool value in blender's UI, preferably in the same place as the vertex values are shown, so people know if the toggle is on or off, buuuut Idk how to do that 😔. Code is largely the same, just changed an operator and a few variable names.
0 likes • Jul '25
Yeah the code I sent to you originally was kinda funky. I did manage to get similar results on my own (well moreso chat gpt gave the results too me) and yeah it looks largely the same to what you sent me. That said I'm still using global variables, but looking at what you sent I think its pretty clear that is no longer needed. Plus I think your script makes it so that the bool can be triggered via the alt button and by clicking on the checkmark in the UI, which is a nice bonus. Ngl most of the changes were quite easy and I could've gotten there on my own if I scrawled through the internet more to understand these concepts on a more fundamental level, so that these "easy" changes would've come to me more intuitively. But alas I don't really have that level of patience 😅.
Jun '25 •
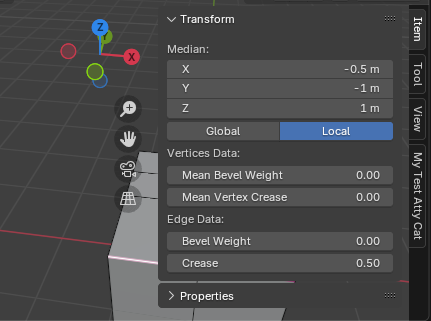
A way to display custom attributes in 3D viewport panel menu
I want to find a way to display custom attributes, in a fashion not to dissimilar to the edge crease attribute, in the 3D viewport panel here(image1). I'm quite a beginner to python programming for blender (though I'm not a stranger to programming in general), so I looked up some tutorials and found this free course, which was very useful. I tried to program in this feature, combining stuff I've seen in this course and other stuff on the internet, and it doesn't work.(image2) Not surprised though, I'm just very curious as to how to fix it! The first issue I've seem to run into is that the "layout.prop()" doesn't seem to be bringing anything up in the 3D viewport panel.(image3) Despite there being a float property in the second argument it doesn't seem to work, and I have a very strong feeling that there's some basic thing I'm missing or syntax I'm misunderstanding. Another thing, if I do manage to get that float property visible in the 3D viewport panel, how will I be able to have that value change depending on the vertex selected. For instance, you may assign vertex 1 with a value of 0.95 and vertex 2 have a value of 1.21 Any help would be greatly appreciated and thank you to Victor Stepanov for this course and especially thanks for making it free!
0 likes • Jul '25
@Victor Stepanov the gif shows how the script seems to work in my project, in addition to not changing per vertex it creates a new attribute every time I change the value. I've attached the script too. Though the name is different, the script is entirely the same, with the exception of some variable names being changed.
1 like • Jul '25
@Victor Stepanov Solid mate this works perfectly! Also can do multi selection too! Thank you. I'll probably come back to ask questions about what-does-what in the code, and how to make this work with faces, and how to change data types other than float values like bools and ints and so on, so I hope I wont be much of a bother poking around and asking questions. Also, any clue when new lessons are going to come out? Don't mean to pressure you, I've just been enjoying them a lot, they're very informative so it would be neat to see more episodes as you dive deeper into the belly of blender python programming. Either way thanks still.
1-6 of 6
