Activity
Mon
Wed
Fri
Sun
Mar
Apr
May
Jun
Jul
Aug
Sep
Oct
Nov
Dec
Jan
Feb
What is this?
Less
More
Memberships
The Potted Garden Society
1.8k members • Free
22 contributions to The Potted Garden Society

Apr '25 •
Why I hesitate to buy Designer Pots?
Well! You can see for yourself in the picture, below. Yeah! Last night, a cat toppled over my pot, breaking it. So, I have to replace the pot for my Burle Marx. If it was a designer pot, I would have burned my expenses. P.S. I don't keep my houseplants inside my home because of absence of sunlight. What do you think? Comment below!
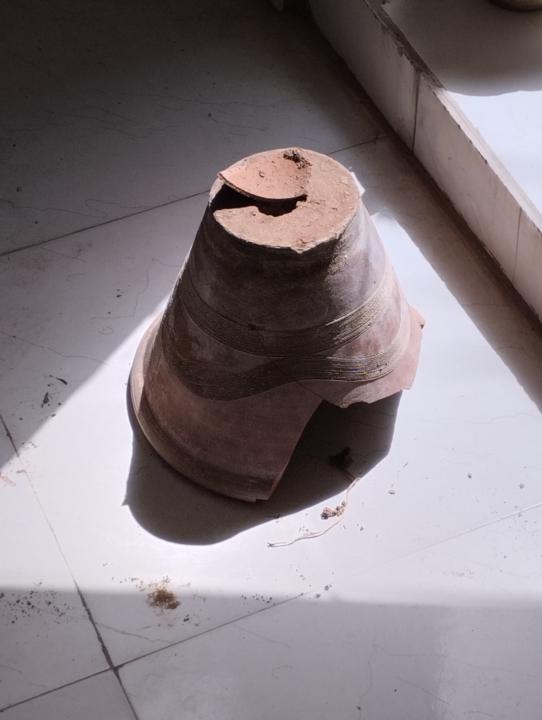

1 like • 15h
I tend to stick to plastic pots. I can lift them.

May '25 •
Repotting Tips and Tricks for Healthier Container Plants
Repotting is a vital part of container gardening, giving your plants the fresh start they need to continue thriving. Whether your plants are root-bound, suffering from depleted soil, or simply outgrowing their containers, knowing when and how to repot can make all the difference. 𝐒𝐢𝐠𝐧𝐬 𝐈𝐭’𝐬 𝐓𝐢𝐦𝐞 𝐭𝐨 𝐑𝐞𝐩𝐨𝐭 Your container plants may be ready for a new home if you notice: * Roots growing out of the drainage holes * Soil that dries out quickly after watering * Yellowing or stunted growth * The plant becoming top-heavy or tipping over * Poor drainage or compacted soil 𝐂𝐡𝐨𝐨𝐬𝐢𝐧𝐠 𝐭𝐡𝐞 𝐑𝐢𝐠𝐡𝐭 𝐏𝐨𝐭t When repotting, choose a new container that is 1–2 inches larger in diameter than the current pot. Make sure it has adequate drainage holes to prevent waterlogging and root rot. For certain plants, a wide, shallow pot may be better than a deep one. 𝐓𝐡𝐞 𝐁𝐞𝐬𝐭 𝐒𝐨𝐢𝐥 𝐟𝐨𝐫 𝐑𝐞𝐩𝐨𝐭𝐭𝐢𝐧𝐠 Use a high-quality, well-draining potting mix appropriate for your specific plant type. Avoid reusing old soil, which may be depleted of nutrients or harbor pests and diseases. * 𝐅𝐨𝐫 𝐟𝐥𝐨𝐰𝐞𝐫𝐢𝐧𝐠 𝐩𝐥𝐚𝐧𝐭𝐬: Use a potting mix with compost and added perlite for drainage. * 𝐅𝐨𝐫 𝐡𝐞𝐫𝐛𝐬 𝐚𝐧𝐝 𝐯𝐞𝐠𝐞𝐭𝐚𝐛𝐥𝐞𝐬: Choose organic mixes rich in nutrients. * 𝐅𝐨𝐫 𝐬𝐮𝐜𝐜𝐮𝐥𝐞𝐧𝐭𝐬: Go with a sandy, gritty mix that prevents moisture retention. 𝐒𝐭𝐞𝐩-𝐛𝐲-𝐒𝐭𝐞𝐩 𝐑𝐞𝐩𝐨𝐭𝐭𝐢𝐧𝐠 𝐆𝐮𝐢𝐝𝐞 𝟏. Water the plant a few hours before repotting to ease removal and reduce stress. 𝟐. Gently remove the plant from its current container, supporting the base and loosening the soil. 𝟑. Inspect the roots: Trim any dead, rotted, or circling roots with clean scissors or pruners. 𝟒. Add fresh soil to the new pot, creating a small mound in the center. 𝟓. Position the plant so the root ball sits just below the rim. Fill in around the roots with more soil. 𝟔. Firm the soil gently and water thoroughly. 𝐀𝐟𝐭𝐞𝐫𝐜𝐚𝐫𝐞 𝐓𝐢𝐩𝐬 * Keep the repotted plant out of direct sunlight for a few days to reduce transplant shock. * Water regularly, but be careful not to overwater as roots adjust.
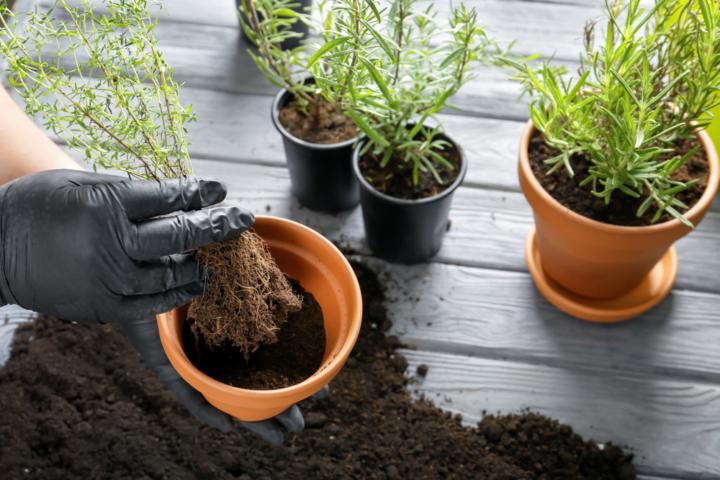
0 likes • 15h
Thank you
May '25 •
The Best Soil Mix for Container Gardens: What You Need to Know
Choosing the right soil mix is fundamental to the success of your container garden. The ideal soil provides necessary nutrients, proper moisture retention, excellent drainage, and a supportive environment for healthy root growth. Here’s everything you need to know about selecting and preparing the best soil for your container plants. 𝐖𝐡𝐲 𝐑𝐞𝐠𝐮𝐥𝐚𝐫 𝐆𝐚𝐫𝐝𝐞𝐧 𝐒𝐨𝐢𝐥 𝐈𝐬𝐧'𝐭 𝐈𝐝𝐞𝐚𝐥 Garden soil might seem an obvious choice, but it's generally unsuitable for container gardening because: - It can compact easily, limiting air circulation and root growth. * It often lacks proper drainage, which can lead to waterlogged conditions and root rot. * It may harbor weeds, pests, and diseases detrimental to container-grown plants. 𝐂𝐨𝐦𝐩𝐨𝐧𝐞𝐧𝐭𝐬 𝐨𝐟 𝐚 𝐆𝐫𝐞𝐚𝐭 𝐂𝐨𝐧𝐭𝐚𝐢𝐧𝐞𝐫 𝐒𝐨𝐢𝐥 𝐌𝐢𝐱 An effective container garden soil mix typically includes these key ingredients: * 𝐏𝐞𝐚𝐭 𝐌𝐨𝐬𝐬 𝐨𝐫 𝐂𝐨𝐜𝐨𝐧𝐮𝐭 𝐂𝐨𝐢𝐫: Provides excellent water retention and aeration. * 𝐂𝐨𝐦𝐩𝐨𝐬𝐭 𝐨𝐫 𝐎𝐫𝐠𝐚𝐧𝐢𝐜 𝐌𝐚𝐭𝐭𝐞𝐫: Supplies essential nutrients and improves moisture retention. * 𝐏𝐞𝐫𝐥𝐢𝐭𝐞 𝐨𝐫 𝐕𝐞𝐫𝐦𝐢𝐜𝐮𝐥𝐢𝐭𝐞: Enhances drainage and aeration, preventing soil compaction. 𝐑𝐞𝐜𝐨𝐦𝐦𝐞𝐧𝐝𝐞𝐝 𝐂𝐨𝐧𝐭𝐚𝐢𝐧𝐞𝐫 𝐒𝐨𝐢𝐥 𝐌𝐢𝐱 𝐑𝐞𝐜𝐢𝐩𝐞 You can easily create your own ideal container soil mix with this simple recipe: * 1 part peat moss or coconut coir * 1 part compost or well-rotted manure * 1 part perlite or vermiculite Mix thoroughly to achieve a balanced, nutrient-rich, and well-draining medium perfect for container gardening. 𝐏𝐫𝐞-𝐌𝐢𝐱𝐞𝐝 𝐒𝐨𝐢𝐥 𝐎𝐩𝐭𝐢𝐨𝐧𝐬 If creating your own soil mix isn't feasible, many quality commercial potting mixes are available. Look for mixes labeled specifically for container gardening, ensuring they include ingredients like peat moss, perlite, compost, and sometimes slow-release fertilizers. 𝐄𝐧𝐡𝐚𝐧𝐜𝐢𝐧𝐠 𝐘𝐨𝐮𝐫 𝐂𝐨𝐧𝐭𝐚𝐢𝐧𝐞𝐫 𝐒𝐨𝐢𝐥 𝐌𝐢𝐱 Boost your container soil for optimal plant health by: * Adding slow-release organic fertilizers to support steady nutrient supply. * Incorporating worm castings for improved microbial activity and additional nutrients. * Periodically refreshing the topsoil layer with compost or mulch to maintain fertility and moisture.
1 like • 15h
This is great information. I have always mixed my own soil for my plumerias. I will mix my own now for my containers also. Thank you.

Jul '25 •
Lookie, Lookie What I Found!
Not Sure Where I'm Going to Put It (Yet) and I Way Overpaid For the Size Of It, BUT I NEEDED It Ya'll! Reminded Me of Our Little Group.
0 likes • 15h
nice.
Aug '25 •
How to Make a Hanging Herb Drying Rack
When your container herb garden is overflowing with fragrant sprigs of basil, mint, thyme, and rosemary, it’s time to start thinking about preserving those flavors for later. One of the simplest (and prettiest!) ways to do that? A homemade hanging herb drying rack. Whether you hang it in a sunny kitchen window or a dry pantry corner, this DIY project is a charming and practical way to celebrate your herbal harvest. 🌿 𝐖𝐡𝐲 𝐃𝐫𝐲 𝐇𝐞𝐫𝐛𝐬? Drying herbs is a low-cost, natural way to preserve their flavor and aroma. It also saves space—perfect for small-space and container gardeners. You can use dried herbs in cooking, teas, homemade sachets, and even DIY gifts. 🧰 𝐖𝐡𝐚𝐭 𝐘𝐨𝐮’𝐥𝐥 𝐍𝐞𝐞𝐝: * A wooden frame, old hanger, or small ladder * Twine or jute string * Scissors * Clothespins or binder clips (optional) * Small bunches of freshly harvested herbs * A warm, dry place with good air circulation 🛠️ 𝐒𝐭𝐞𝐩-𝐛𝐲-𝐒𝐭𝐞𝐩 𝐈𝐧𝐬𝐭𝐫𝐮𝐜𝐭𝐢𝐨𝐧𝐬: 𝟏. 𝐂𝐡𝐨𝐨𝐬𝐞 𝐘𝐨𝐮𝐫 𝐁𝐚𝐬𝐞 * Repurpose an old wooden hanger, a picture frame, or even a tree branch for a rustic look. * A ladder-style plant stand or wall rack also works beautifully if you have extra space. 𝟐. 𝐀𝐭𝐭𝐚𝐜𝐡 𝐇𝐚𝐧𝐠𝐢𝐧𝐠 𝐒𝐭𝐫𝐢𝐧𝐠𝐬 * Cut lengths of twine or jute and tie them horizontally across the base, creating a simple grid or rows of lines. * Secure tightly so they won’t sag under the weight of the herbs. 𝟑. 𝐁𝐮𝐧𝐝𝐥𝐞 𝐘𝐨𝐮𝐫 𝐇𝐞𝐫𝐛𝐬 * Harvest herbs like rosemary, thyme, oregano, sage, lavender, mint, or basil. * Tie them into small bundles using another piece of twine or a rubber band at the stem base. 𝟒. 𝐇𝐚𝐧𝐠 ‘𝐄𝐦 𝐔𝐩 * Hang the herb bundles upside down by tying them directly to the rack or clipping them with clothespins or clips. * Make sure they have good airflow and aren’t too crowded. 𝟓. 𝐅𝐢𝐧𝐝 𝐭𝐡𝐞 𝐑𝐢𝐠𝐡𝐭 𝐒𝐩𝐨𝐭 * Hang your rack in a warm, dry area away from direct sunlight. * A pantry, laundry room, or sunny window with filtered light is perfect. 𝟔. 𝐖𝐚𝐢𝐭 & 𝐒𝐭𝐨𝐫𝐞 * Most herbs dry in 1–2 weeks depending on humidity. * Once fully dry (crispy, not limp), crumble and store in airtight jars or paper envelopes in a cool, dark spot.
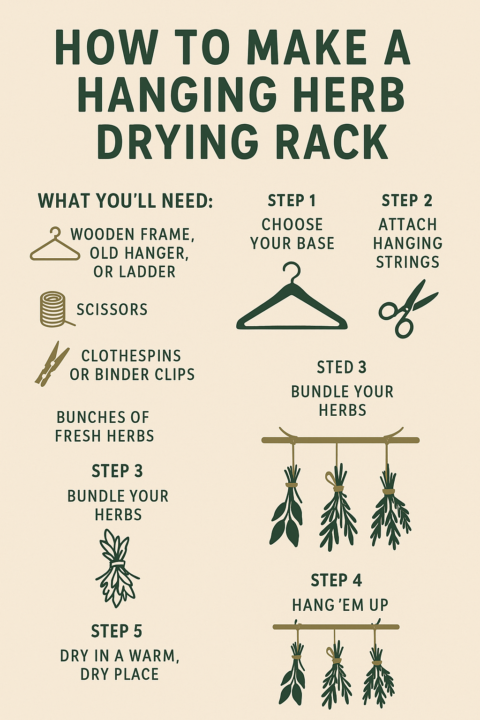
1 like • 16h
Thank you for this. I am growing herbs this year for the first time. This is great
1-10 of 22
@diana-walker-2680
Hi all, Diana from Jacksonville Florida zone 9b. I garden with above ground 4" high beds. My passion is Plumerias. I currently have over 100 of them.
Active 15h ago
Joined Dec 5, 2025
Jacksonville Florida
Powered by