
Write something

17h •
Welcome to Toolkit Progress...
This is the place to post anything you are trying from the Free Starter Toolkit. You can share: • one change you made to your room • one piece of gear you are testing • one problem you are trying to solve • one useful resource you found • one short recording or creative experiment • one question before you buy something unnecessary and expensive, humanity’s favourite hobby Start simple: What is one thing you are going to try from the Toolkit this week?
1
0
Apr 21 •
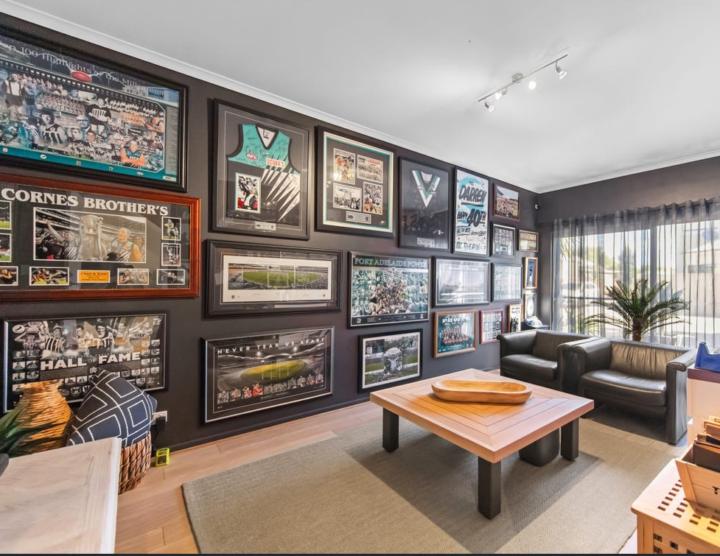
How I Built My Home Studio from Scratch
Part 1: Planning the Studio This is the first in a series of 10 posts about how I planned and designed this room, from before we even moved in, through to building a functional studio. About 12 months ago, my family and I moved into a new house. Part of the decision to buy it was this room. I knew from the start that it would become my office and studio space. The house is a three-bedroom, two-storey semi-detached home, and this room is essentially a converted garage. The previous owner had used it as a shrine to his favourite AFL team, which made it memorable for reasons both practical and deeply Australian. Image 1. This was the room when we first inspected the house. Not a studio yet, but I could already see the potential. It had laminate wood flooring, dark grey paint, and plenty of holes in the walls where framed pictures had been hung. The room measures 3.0 x 5.8 metres. Image 2. The floor plan showed the room as a 3.0 x 5.8m lounge on the ground floor. Before we had even made an offer on the house, I was already convinced this was the room. I even rushed out and bought some cheap second-hand ceiling insulation, which I’ll come back to in a later post. Once the purchase started moving forward, I began planning the layout. Using the real estate floor map, and my best memory of where the power points were, I made a simple Canva mock-up to work out where everything might go. It also helped me start thinking about what I needed to buy, what I could reuse, and what I’d need to sell or give away as part of the upgrade. Image 3. My rough first pass on the floor plan, working out the room size and main zones. Image 4. One early layout version, back when I thought I might fit the motorbike in there too. In the next post, I’ll share what the room looked like once it was empty, what I tackled first, and how it quickly went from blank space to crowded chaos to the start of a working studio. Have you ever planned out a studio, workspace, or creative room before moving things in?
Apr 28 •
How I Built My Home Studio from Scratch
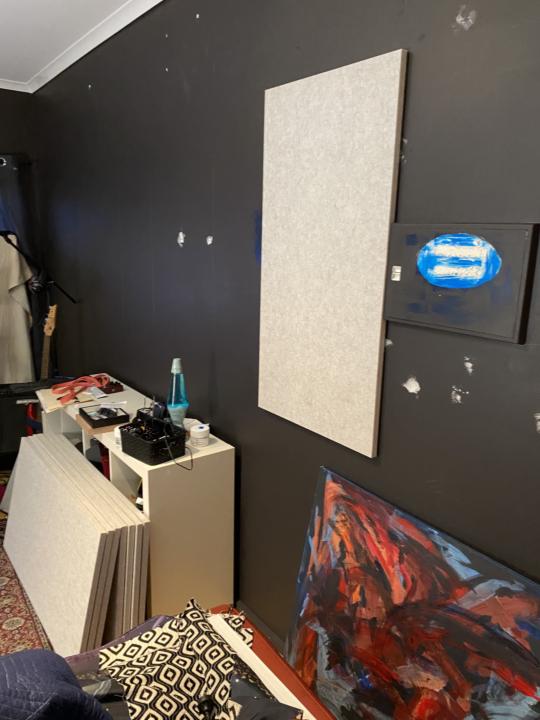
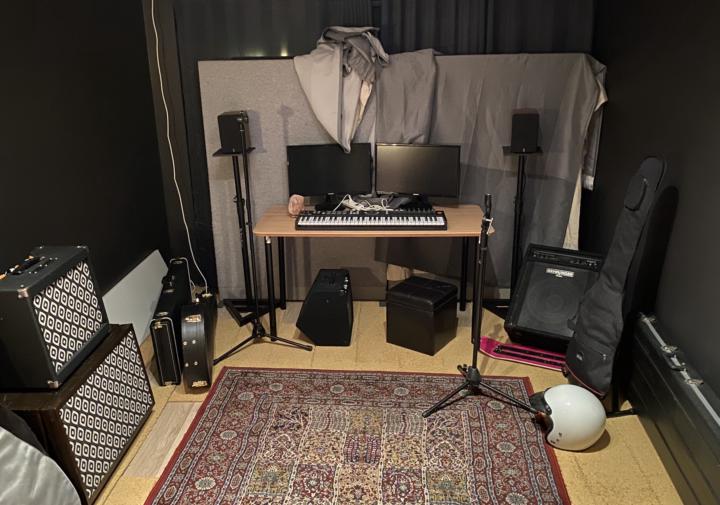
Part 6: When the Studio Starts Working (And You Start Changing It Again) At some point, the room stops feeling like a project and starts feeling like something you can actually use. This was that point. It wasn’t finished. There were still things to fix, move, and clean up. But the important shift had happened: · I could walk into the room, sit down, and start. · The desk was set up. · The speakers were in place. · The instruments were within reach. Nothing needed to be unpacked or assembled before doing anything. And that changed everything. But something else happened at the same time. As soon as the room became usable, I immediately started finding things to improve. That’s when I began putting up acoustic panels and doing some painting. Part of that was practical. The panels helped shape the sound of the room, and the paint started to give it a more defined identity. But part of it was something else. It was a form of what I think of as “relevant procrastination.” Instead of sitting down and recording, it’s very easy to drift into: • adjusting the room• improving the setup• making things look and feel better All of which are useful… but not the main job. So this stage becomes a balance. On one side: • making the room better • improving sound and feel On the other: • actually using the space to create Because a studio doesn’t need to be perfect to be useful. It just needs to be ready enough that you can walk in and start. From here, the focus shifts from building the room to managing that balance. I was focused on putting up these sound panels, mainly to stop sound bouncing between the hard surfaces around the room. IMAGE 1: First panel going up. At this point I was mostly testing placement and getting a feel for how the room would respond, not aiming for a perfect setup. IMAGE 2: Half working, half in progress. The room was usable at this point, but I kept finding reasons to keep improving it instead of just sitting down and recording. IMAGE 3: Starting to take shape. The panels made a noticeable difference, but this is also where I started slipping into “just one more improvement” mode.
Apr 27 •
How I Built My Home Studio from Scratch
Part 5: Choosing the Layout and Defining the Space Once the room was clear enough to work with properly, the next step was deciding how it was actually going to function. This was the stage where it stopped being an empty shell and started becoming a real studio in practical terms. I had already thought a lot about the layout before moving in, but now I could test those ideas against the actual space instead of just guessing. That meant thinking about where the desk would go, how the room would flow, what needed to be within reach, and how to use the walls and floor space without making everything feel cramped. But it was also the point where I had to make some clearer decisions about what this room was for — and what it wasn’t. IMAGE 1: Early layout phase. Working out where the desk, speakers, and recording space would actually sit in the room. Not finished, but starting to take shape. One of those decisions was not trying to use the room to store the motorbike as well. That probably could have been made to work in a technical sense, but it would have changed the whole room. It would have turned it into a compromise space, part studio and part storage, and that would have affected every other decision about furniture, equipment, access, layout, and day-to-day use. I didn’t want that. I wanted this room to function properly as a workspace and studio, not just as a place where a few music things happened to live alongside everything else. So the layout wasn’t just about where to put a desk. It was about defining the purpose of the room. IMAGE 2: Rough layout thinking at the time. Not a precise plan, but a way of working out zones — where to work, where to record, and what needed to stay out of the room. Once that became clear, everything else got easier. What stayed in the room. What didn’t. Where the main working position should be. How to leave enough space to move, think, and work without constantly fighting the room. This was one of the most important stages of the whole process.
Apr 24 •
How I Built My Home Studio from Scratch
Part 4: The Studio Starts to Appear After the room had been used as a dumping ground during the move, the next stage was not some polished “studio reveal” moment. It was messier than that. This was the point where the studio started to appear in layers. Image 1: The room was no longer empty, but it definitely wasn’t finished. The first version of the studio was starting to appear underneath the moving chaos. The desk was in. The keyboard was in. The speakers were up. The rug was down. Instruments started finding places around the room. The first bits of acoustic treatment were leaning, hanging, or generally existing in that temporary-but-useful way things do when you are still figuring out the space. And at the same time, there was still stuff everywhere. Boxes. Cases. Pedals. Cables. Chairs. Random gear. Things waiting to be sorted. Things that probably had no business being in the room at all. But that is part of the process. Image 2: This is the glamorous part nobody puts in the brochure: pedals, cables, cases, chairs, and every half-sorted thing fighting for floor space. A home studio does not usually arrive fully formed. It starts as a rough working version. You place things where they seem to make sense, then you test the space, then you move things, then you realise something is annoying, then you change it again. This stage was about getting the room functional enough to start understanding it. Where does the desk feel right? Can I move around comfortably? Are the instruments accessible? Is the listening position workable? What needs to be close by? What is just clutter pretending to be important? That last question matters more than I expected. Image 3: Slowly, the room started becoming usable. Not perfect, not polished, but close enough to understand how the space might actually work. Because it is very easy for a studio to become full of interesting things that quietly get in the way of actually making music. Gear, accessories, spare furniture, half-finished ideas, future projects, and “I’ll sort that later” objects all pile up quickly.

1-14 of 14
skool.com/room-to-record
Build your creative space in 30 days. Then use it to finish your next song, video, podcast or project.
Leaderboard (30-day)
1

+3
2

+2
3

+1
4

+1
5
+1
Powered by