
Write something

Sep '25 •
If You Had to Fix ONE of These Sunday Problems First, What Would It Be?
Let’s test this out: You walk into church on Sunday and the mix is a mess. You only have time to fix one thing before service starts. Which do you pick?
Poll
9 members have voted

Oct '25 •
🥁 How to EQ Drums in a Church Mix (The Real-World Guide)
Drums are one of the hardest instruments to EQ in a church setting.Every room’s different. Every drummer’s different. Every kit sounds like it came from a different planet. But the truth is — if you understand what you’re listening for and why you’re cutting or boosting, EQing drums gets a lot easier. Let’s break it down piece by piece 👇 🥁 KICK DRUM The goal: tight, punchy, and not boomy. Start with these moves: - High-pass filter under 40 Hz — removes unnecessary sub rumble that muddies the room. - Boost around 60–80 Hz for low-end thump (but carefully — too much and it eats your mix). - Cut around 250–400 Hz to get rid of boxiness. - Add a small boost at 3–5 kHz for beater attack and clarity. Pro tip:If your room has subwoofers near the stage, avoid over-boosting the lows — your mix will sound fine in headphones but way too heavy in the sanctuary. 🥁 SNARE DRUM The goal: crisp and present, but not harsh. Start here: - High-pass up to 80–100 Hz — clean up low-end rumble. - Cut around 400–600 Hz to remove “cardboard” tone. - Add a small lift around 2–5 kHz for stick definition. - Air around 10 kHz if it sounds dull. Pro tip:If your snare sounds “honky” or nasal, notch out 800 Hz slightly.And if the bottom snare mic is too bright, low-pass it around 8 kHz to tame the buzz. 🥁 TOMS The goal: clear, round, and natural. EQ starting points: - High-pass around 60–100 Hz (higher for smaller toms). - Cut around 400–600 Hz to remove the boxy tone. - Add around 5–7 kHz for stick attack. - Slight boost at 100–150 Hz for fullness. Pro tip:Don’t EQ toms in solo mode. Always listen in the context of the kit — what sounds huge soloed often muddies everything together. 🥁 HI-HATS & OVERHEADS The goal: clear, natural shimmer — not harsh noise. EQ moves: - HPF option 1: high pass the lows at up to 300-600Hz (if you just want the shimmer of the cymbals/hh) - HPF option 2: high pass to around 100-150Hz so you can have the fundamental tone of the snare in the overheads, then you do more cuts at around 300-800Hz to clean up the boxy sound - Boost lightly around 8–12 kHz for brightness.
2
0

Sep '25 •
The Real Reason Your Kick Drum Sounds Like a Basketball
I’ll never forget the first time I mixed in a church where the kick drum sounded like someone bouncing a basketball on the stage. Every time the drummer hit, instead of a punch that anchored the band, it was just this hollow “thud-thud-thud.” And the worst part? No matter how much EQ or compression I threw at it, it still sounded terrible. 👉 That’s when I realized something that changed the way I approach drums: the problem wasn’t the console—it was the mic placement. Why Mic Placement Matters More Than EQ Here’s the thing most people don’t realize: - If the mic isn’t in the right spot, you’re EQ’ing garbage. - Move the mic just 2 inches, and the whole tone changes. - Placement can give you body, attack, or mud—before you even touch the board. Let me break it down: - Mic too far inside the kick → You’ll get lots of attack (clicky sound), but almost no low-end body. It can cut through the mix but sound thin. - Mic too far outside the kick → You’ll get all the boom and rumble, but no definition. Great for reggae, not so much for worship. - Mic halfway in, pointed at the beater → This is usually the sweet spot. You’ll capture both the “thump” of the low end and the “snap” of the beater. The EQ Problem Now, if the mic is in the wrong place, you’ll start boosting lows or highs to compensate. But here’s the issue: - Boosting lows just makes the basketball sound louder. - Boosting highs just makes the click harsh. - And no matter what you do, the mix won’t feel solid. The Fix 1️⃣ Start at the SourceBefore touching EQ, move the mic. If possible, experiment with depth and angle. Just a few inches can make a massive difference. 2️⃣ Dial in EQ After PlacementOnce the mic is in a good spot: - Roll off the sub-rumble under 40Hz. - Boost a touch around 60–80Hz for thump. - Cut around 250–400Hz to remove boxiness. - Add a little 2–4kHz for definition (if needed). 3️⃣ Check PhaseIf you’re using multiple mics (kick in + kick out), make sure they’re in phase. Otherwise, you’ll cancel out low end instead of building it.
Poll
4 members have voted

Sep '25 •
Wireless Mics Cutting Out? Here’s Why It Happens Every Sunday
Let’s be honest—nothing kills a moment faster than a pastor or worship leader’s mic cutting in and out mid-sentence. You hear the first word, then silence, then it pops back in like nothing happened. And the first thing everyone does? Look at you in the booth 😅. Here are the real reasons it happens in churches (and how to fight it): 1. Antennas hidden or blockedIf your receiver antennas are stuffed behind a rack or pointed at the floor, you’re asking for trouble. Always get them above head height and line-of-sight with the stage. 2. Too far from the receiverMost budget systems start struggling past 100 ft, especially if there are walls or bodies in the way. Distance = dropout. 3. Frequency chaosIf your wireless is running in the same band as Wi-Fi routers, lighting controllers, or other wireless mics, expect interference. Always scan and set clear frequencies. 4. Cheap batteriesHalf the “mystery cutouts” I’ve seen came down to weak AA batteries. Spend a few extra bucks on quality rechargeables—it’s worth it. ⚡ Pro tip: In churches where the stage is far from the booth, use remote antennas on stands closer to the platform. That single change can take you from constant dropouts to rock-solid audio. 💬 Question: What’s the biggest cause of wireless mic dropouts in YOUR church—distance, interference, or just bad batteries? — Nate
Poll
2 members have voted

Sep '25 •
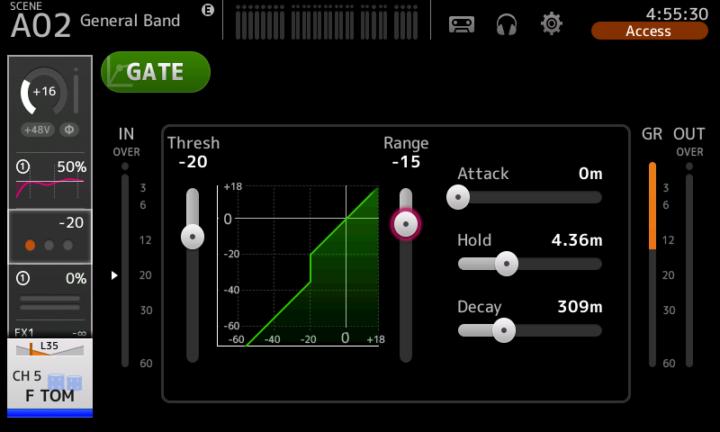
Why a Noise Gate Can Save (or Ruin) Your Mix
I was mixing a youth night once, and the drummer had a snare mic that was picking up everything—cymbals, toms, even the bass player’s amp bleeding in. The snare itself sounded okay, but the bleed made the whole mix messy. So I dropped a gate on the snare. Problem solved… or so I thought. During the service, the drummer hit a couple of softer ghost notes, and the gate completely chopped them off. The snare went from alive and natural to robotic and awkward. People in the band even looked back like, “What just happened?” That’s when I realized something important: a gate is powerful, but it has to be set carefully. What a Gate Actually Does A gate is basically an automatic mute. - When the signal is above the threshold → it opens. - When the signal is below the threshold → it closes (or reduces volume). In live sound, gates are mostly used to clean up drums or noisy stage mics. How to Use a Gate in Church Sound 1️⃣ Kick Drum - Gates keep the mic from picking up bass, stage rumble, and monitor bleed. - Tip: Set threshold so it opens on every kick, but not on the bass guitar. 2️⃣ Snare Drum - Cleans up hi-hat bleed (the biggest offender). - But don’t set it so tight that ghost notes get chopped. 3️⃣ Toms - This is where gates shine. Instead of open mics picking up cymbals all service long, gates only open when toms are hit. Cleaner mix instantly. 4️⃣ Speech Mics (Sometimes) - Gates can reduce background noise, but be careful—if set wrong, they make the pastor’s first word of every sentence disappear. ⚡ Pro tip: Start with a slower release time so the gate doesn’t “slam shut” and sound unnatural. The goal is transparency, not obvious chopping. Have you ever had a gate save your Sunday… or completely ruin it? Drop your story—I know I’m not the only one who’s had a snare vanish mid-service 😅. — Nate
1
0
1-14 of 14
powered by

skool.com/church-audio-engineers-2670
Your hub for church sound, livestream mixing, and Sunday audio solutions—practical tips, training, and community for church sound teams by NATE Audio.
Suggested communities
Powered by