
Write something
17d •
5 month peptide transformation
70kg->75kgAs an Australian I was skeptical about peptides as I thought there would be a lot of fake stuff going around. Safe to say it’s been the best decision. Can’t forget the importance of proper training and diet! In this 5 month period my stack has been:GHK-CU 2mg daily 8weeks on 2weeks offRETA towards the last 2.5 months I started at 0.5mg a week for 3 weeks then upped to 1mg for 6 weeks (found I was super responsive and only needed a low dose)HGH 4iu daily for the past 3 months not so much for muscle mass but for the sleep quality properties and recovery. Also gives me a great pump 😂MT1 the past month I started supplementing mt1 at 500mcg daily for 2 weeks then dropped to 1mg a week Edit: because a lot of people think I am “ruining my youth” running these supplements, you don’t need to worry about me. I have gotten a very comprehensive blood panel both pre and post this transformation. My GP would alert me if something was out of the ordinary. I have been looking into Mot-C anyone have feedback on how that went for them or any other peptides that people love.
2
0

Jun 3 •
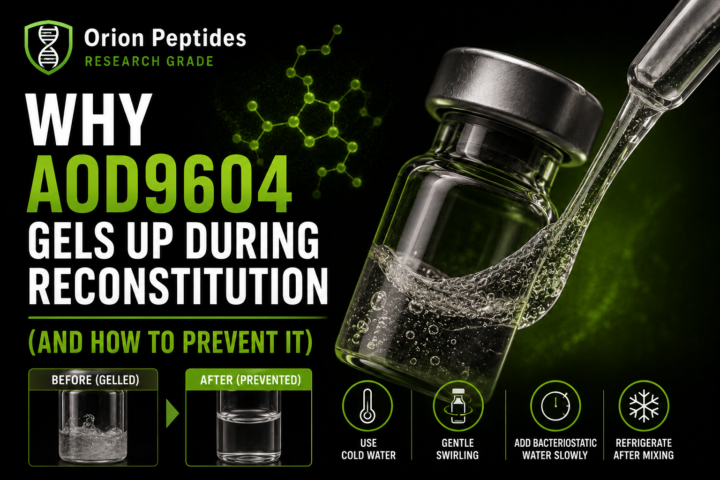
Why AOD9604 Gels Up During Reconstitution (And How to Prevent It)
Before we get into this, I want to thank Orion Peptides for supporting my educational content on peptide science and formulation insights. Use code Parker15 for 15% off. AOD9604 Has a Very Specific Handling Problem AOD9604 behaves differently from many other peptides during reconstitution. One of the most common issues people report is: “It turns into a gel or thick solution instead of dissolving properly.” This isn’t random — it’s due to a combination of molecular behaviors that interact with each other. Once you understand the mechanism, the solution becomes much easier to apply correctly. The 3 Reasons AOD9604 Gels Up There are three main processes responsible for this effect: 1. Hydrophobic Clustering AOD9604 has hydrophobic (water-repelling) regions in its structure. When exposed to water too quickly: • molecules cluster together • they aggregate instead of dispersing • viscosity increases rapidly This creates the first stage of gel formation. 2. Disulfide Bond Chaining Certain structural elements in peptides can promote weak bonding interactions between molecules. In AOD9604: • partial chaining can occur during agitation • clusters become more stable • the solution becomes increasingly thick This reinforces the aggregation process started by hydrophobic clustering. 3. Air–Liquid Interface Damage (Shaking Effect) This is one of the most overlooked factors. When a vial is shaken: • air bubbles form throughout the solution • peptides accumulate at air-liquid boundaries • structural disruption occurs at the interface This dramatically accelerates aggregation and gel formation. Why These Three Problems Feed Each Other The key issue is that these mechanisms are not independent. They amplify each other: • hydrophobic clustering starts aggregation • disulfide interactions stabilize it • air-liquid disruption accelerates it further That’s why AOD9604 is more prone to gelling than many other peptides. How to Properly Reconstitute AOD9604
0
0
May 25 •
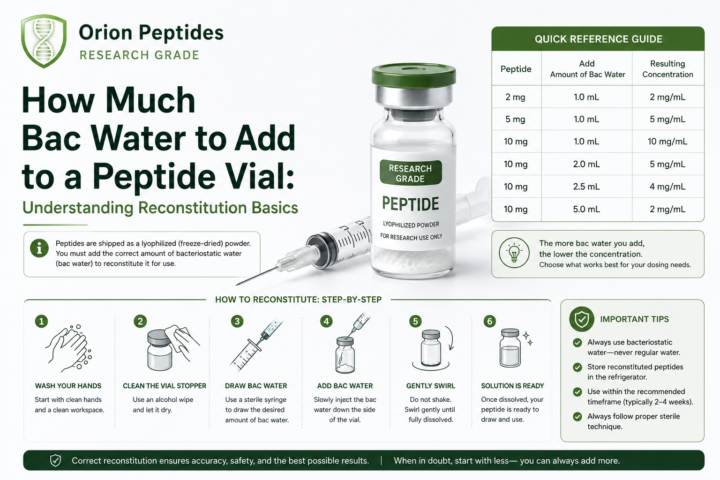
How Much Bac Water to Add to a Peptide Vial: Understanding Reconstitution Basics
One of the most common points of confusion in peptide preparation is how much bacteriostatic water (“bac water”) to add to a vial. While it looks complicated at first, the system becomes very simple once you understand the relationship between mass (mg) and volume (mL). This is strictly an educational breakdown of reconstitution principles used in research discussions. The Core Concept: It’s All About Concentration Reconstitution is not about a universal fixed amount of water — it’s about creating a usable concentration. Two key variables define everything: - Peptide amount (mg) = total compound in the vial - Bacteriostatic water (mL) = dilution volume Together, they create: mg per mL (concentration) This is what determines how syringe units translate into actual compound amounts. Example 1: 10 mg Vial A simple, commonly used educational ratio: - 10 mg peptide - 1 mL bac water This produces: 10 mg / 1 mL = 10 mg per mL concentration On a standard insulin syringe: - 100 units = 1 mL - 10 units = 0.1 mL So in this setup: - 10 units = 1 mg - 20 units = 2 mg - 40 units = 4 mg Example 2: 30 mg Vial Scaling the same logic: - 30 mg peptide - 3 mL bac water This also produces: 10 mg per mL concentration Meaning the syringe conversions remain identical: - 10 units = 1 mg - 20 units = 2 mg - 40 units = 4 mg The key benefit here is consistency — once the ratio is understood, the math stays linear. Why This Confuses So Many People Most confusion comes from mixing up three separate ideas: - Volume (mL or syringe units) - Total compound amount (mg) - Concentration (mg/mL) A syringe only measures: liquid volume It does not indicate how much active compound is present unless the concentration is known. Why Standard Ratios Are Used Using proportional reconstitution methods (like 1 mL per 10 mg or 3 mL per 30 mg) helps because: - calculations remain consistent - syringe measurements become predictable - interpretation is easier across different vial sizes - errors from mental math are reduced in theoretical discussions
May 25 •
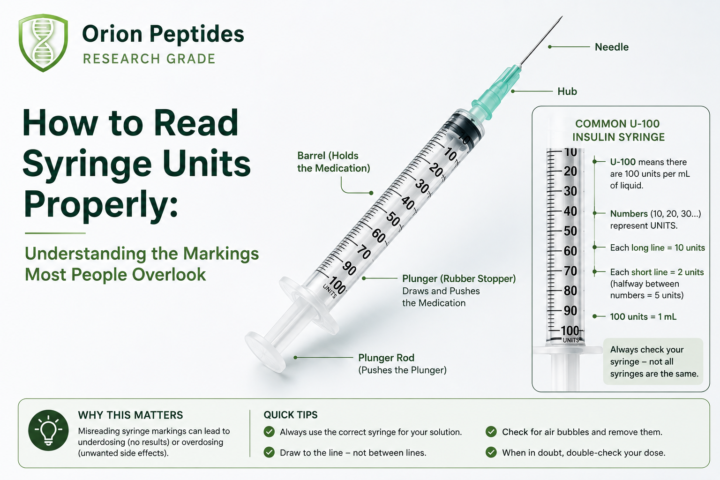
How to Read Syringe Units Properly: Understanding the Markings Most People Overlook
One of the most common points of confusion in peptide and research dosing discussions is something surprisingly simple: people don’t actually understand how to read an insulin syringe. At first glance, it looks like a bunch of numbers and lines. But once you understand the structure, it becomes straightforward. The Basic Structure of a Syringe Most insulin-style syringes are labeled in units, not milliliters. The key thing to understand is: - 100 units = 1 mL - 50 units = 0.5 mL - 10 units = 0.1 mL So the entire syringe is just a volume measurement tool, not a potency indicator. What the Numbers Mean On a standard syringe, you’ll usually see larger labeled markers such as: - 10 - 20 - 30 - 40 - 50 - 60 - 70 - 80 - 90 - 100 These are the main reference points for volume. Each of these represents: a specific volume of liquid inside the syringe barrel What the Small Lines Actually Are This is where most confusion happens. Between each numbered marker are smaller lines. These smaller lines represent incremental units of volume. In many standard syringes: - each small line = 2 units - so the count progresses like: Then it continues: - 12 - 14 - 16 - 18 - 20 And so on. So instead of jumping from number to number, you are actually reading fine increments of liquid volume. Why This Confuses So Many People Most confusion doesn’t come from the syringe itself. It comes from: - assuming “units” are a dose - not understanding that units are just volume - and not recognizing the difference between markings and concentration So when someone sees “20 units,” they may misinterpret it without context of: - how the solution was prepared - or what concentration is inside the vial That’s where errors usually start. The Key Concept to Remember A syringe does not measure “strength.” It only measures: how much liquid you are drawing The actual amount of active compound depends entirely on: - concentration (mg/mL) - and how the solution was mixed
1
0
May 20 •
Why You Should Never Store Peptides in a Kitchen Fridge
Proper storage conditions are one of the most overlooked aspects in peptide handling and research workflows. While many assume a standard kitchen refrigerator is “good enough,” there are several practical and environmental issues that make it far from ideal for maintaining compound integrity. Here are three key reasons why kitchen fridge storage is often problematic in research contexts. 1. Temperature Fluctuations Every Time the Door Opens Kitchen refrigerators are not stable environments. Every time the door opens: - warm air enters - internal temperature shifts occur - humidity levels fluctuate - cooling cycles adjust rapidly afterward For temperature-sensitive compounds, these repeated micro-fluctuations can be an issue over time. Peptides in particular are known to be sensitive to: - inconsistent thermal conditions - repeated freeze-thaw exposure (if improperly stored) - and long-term degradation from unstable environments While a fridge may appear “cold enough,” consistency matters more than the average temperature. 2. Contamination Risk From a Food Environment A kitchen fridge is fundamentally designed for food storage, not research compounds. That introduces several potential exposure risks: - airborne moisture from opened containers - cross-contamination from food packaging - odor transfer from strong-smelling foods - general bacterial presence in a high-use environment Even when vials are sealed, repeated exposure to a food-based environment increases the risk of handling contamination during routine access. For research materials requiring cleanliness and stability, environment separation becomes an important factor. 3. Lack of Organization and Physical Protection Another major issue is simple storage chaos. Most kitchen fridges are not designed for: - vial organization - upright protection of small containers - separation of compounds - or impact prevention Common scenarios include: - vials knocked over during food retrieval - accidental contact with liquids or packaging - misplaced or forgotten compounds behind other items - and unnecessary physical stress on stored materials
0
0

1-27 of 27
powered by

skool.com/biohacking-and-longevity-group-3757
All-in-one peptide education community. 🧪
Dosing guides, storage protocols, stacking frameworks, vendor intel, GLP-1 research, and expert support.🧬
Suggested communities
Powered by