Activity
Mon
Wed
Fri
Sun
Aug
Sep
Oct
Nov
Dec
Jan
Feb
Mar
Apr
May
Jun
Jul
What is this?
Less
More
Owned by Trent
Helping baseball players build confidence, handle adversity, and stay mentally in the game when competition gets tough.
Memberships
ACQ Vantage Growth
145 members • Free
Skoolers
166.7k members • Free
ACQ VANTAGE
1.1k members • $1,000/month
The Institute Social
63 members • $39/month
33 contributions to The Institute Social

15d •
When The Bottleneck Changes, Your Focus Has To Change
One of the biggest operator lessons I am thinking about right now: The bottleneck changes as the business gets stronger. At one stage, the problem might be survival. Then it might be systems. Then capacity. Then team standards. Then customer experience. Then demand. If you keep solving yesterday's bottleneck, you can work hard and still stay stuck. That is why I try to ask: What is the actual constraint right now? For The Institute, there were seasons where the biggest issue was structure, systems, or getting the machine more stable. Now the facility is more ready. The standards are higher. The experience is cleaner. The machine is stronger. So the next question becomes: How do we get more qualified people to see it? That changes the work. Content is not just posting. Marketing is not just likes. Attention is not the scoreboard by itself. The path is: Qualified eyes -> assessments -> trials -> starts -> memberships. That is the type of thinking every operator needs. Do not ask, "What should I do more of?" Ask, "What is the constraint right now, and what work directly attacks it?"


0 likes • 15d
It's a NEW season for the Institute!
27d •
Codex is the Best Assistant
Real quickly, I wanted to share with you all that Codex helped me prepare for my most recent seminar I finished an hour ago. I had Codex create a PowerPoint presentation for me through Google Slides. I went through my executive chat and strategized what content I wanted to have in Seminar 3. I also sent chat a link to an old PowerPoint presentation that I created for the same topic. We strategized on the changes, and then I had Chat come up with a prompt to input into Codex for it to create this new and improved PowerPoint presentation for me. I did all of this on the $20/month subscription. I would strongly suggest spending time to learn Codex. The PowerPoint it created for me was relatively basic, but I imagine that if I spent more time learning it, I could have it create an even better PowerPoint next time. I'm really starting to understand how powerful of a tool Codex really is, and it's really just the limits of our imagination for what we can use it for.
0 likes • 27d
@Gilbert Urbina Definitely going to keep my eyes peeled, this is something I want to master!
28d •
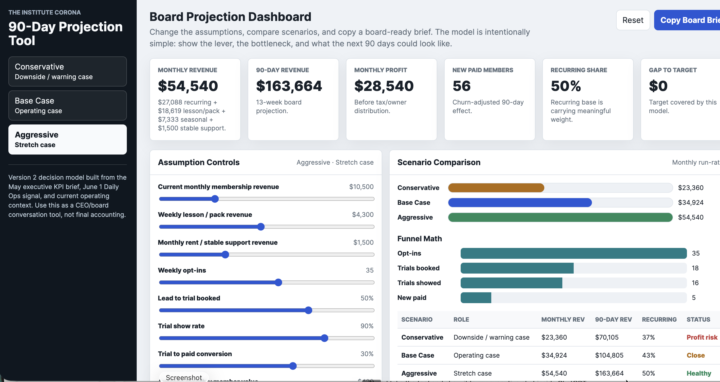
Stop Guessing And Let The Numbers Talk
The other night I built a 90-day revenue projection tool with my Codex executive assistant. The tool lets me look at projected income and revenue for the business over the next 90 days. But the important part is not just that AI built a tool. The important part is why the tool is useful. It has context. Codex is already helping me operate the business: - it helps with transactions - it updates KPI workflows - it understands my Notion structure - it sees the numbers I track - it knows the operating rhythm of the business So when I ask it to build a projection tool, it is not starting from a blank prompt. It is building from real context. Then I take the tool and show it to my executive chat inside ChatGPT. That chat gives me feedback on how to make the tool better. So now the loop looks like this: Business data -> Codex builds the tool -> ChatGPT critiques the tool -> Codex improves the tool -> I make better decisions. That is the part most people are missing with AI. They are still using it like a one-off answer machine. But the leverage is when AI has enough context to help you see the business more clearly. At some point, you have to stop guessing. Look at the numbers. Build the tool. Improve the tool. Make the decision cleaner. I attached screenshots of the tool so you get an idea what it looks like. Quick question: What is one decision in your business that you are still making mostly off feel instead of data?
1 like • 27d
The more I play with Codex, the more I'm so amazed with all the things that we can have it do for us. This is really cool. Looking forward to implementing this when I'm a little further along in my business. To answer your question though, very soon I will need to look at data for my skool community traffic based on all the content that I'm putting out on multiple platforms.
Jun 5 •
CODEX Win
I wanted to share my first quick win with Codex. For context, I am doing a sports psychology seminar for a youth travel ball organization for two weeks: this week (Wednesday and Friday) and next week (Wednesday and Friday). The co-owner of the travel organization created an online sign-up. When somebody registers for the event, I am also sent an email with their contact information (name, phone number, and email address). What I had Codex do was skim through my email and come up with an email list of everyone who registered for one of my seminars. With this email list, I was able to easily copy and paste into my Gmail, giving me an easy way to contact all of them. Afterwards, I went to my executive chat and told them about the seminars I was doing. It helped me draft some emails where I push them toward my free SKOOL community and my lead magnet: a free 7-minute course on the foundational tools of the mental game. In a sequence of emails, I also sent them the link to the next Google Meet for Seminar 2, the YouTube link for the first seminar that I recorded, and my sport psych Instagram. I'm sharing this because originally I was just going to treat this seminar as a way to get in front of some parents and cross my fingers hoping one of them would want their athlete to do one-on-one coaching. Now, with the help of Codex, this is a lot more of a calculated move to have these families within my ecosystem. I can't wait to keep learning about different ways to use Codex to save me time and make me a sharper entrepreneur!
May 25 •
WIN OF THE WEEK:
Big shoutout to @Trent MacKinney. He decided to start his own Skool community and gave himself a real deadline because he has 4 upcoming sports psychology presentations with a youth baseball organization. In one week, he already: Built his Skool bio and about page Created branding assets Structured the community Planned, scripted, and started recording his free course This is exactly what we want inside The Institute Social. Not just learning. Not just collecting ideas. Installing the system, making decisions, and turning the work into something real. Trent, this is a big move. Excited to see this go live. Question for everyone: What is one thing you could stop thinking about and actually build this week?
0 likes • May 26
Thank you Gilbert! 💪 Hopefully this inspires someone to just go for it this week!
1-10 of 33

@trent-mackinney-1723
M.S. Sport and Performance Psychology /
I help baseball players stay mentally in the game and handle adversity without losing belief in themselves ⚾
Active 14h ago
Joined Nov 17, 2025
ENFJ
Riverside, California