Activity
Mon
Wed
Fri
Sun
Aug
Sep
Oct
Nov
Dec
Jan
Feb
Mar
Apr
May
Jun
Jul
What is this?
Less
More
Memberships
Homeschool Co-Op Online
93 members • $79/month
STUDYOLOGY™ Spanish
9 members • $5/month
OS
Old School Homeschool
27 members • Free
My Homegrown Solutions
23 members • Free
Homeschool Village Community
133 members • $25/month
History-Based Unschooling
22 members • Free
Unschool Vibes
121 members • Free
Homeschool High School
59 members • Free
The Homeschool Village
125 members • Free
2 contributions to The Big Sweep

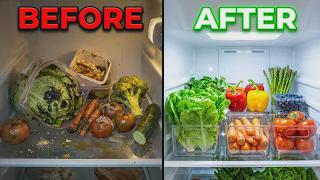
Feb 10 •
𝑰 𝑪𝒉𝒂𝒏𝒈𝒆𝒅 𝑯𝑶𝑾 𝑰 𝑪𝒍𝒆𝒂𝒏 𝑴𝒚 𝑭𝒓𝒊𝒅𝒈𝒆... 𝑴𝒚 𝑽𝒆𝒈𝒆𝒕𝒂𝒃𝒍𝒆𝒔 𝑵𝒐𝒘 𝑳𝒂𝒔𝒕 𝟑 𝑾𝑬𝑬𝑲𝑺 𝑰𝒏𝒔𝒕𝒆𝒂𝒅 𝒐𝒇 𝟑 𝑫𝒂𝒚𝒔!
What if I told you the reason your vegetables rot so quickly isn't because they're bad quality, but because of how you're cleaning your fridge? What if one simple change in your cleaning method could triple the shelf life of your food and save you hundreds of dollars in wasted groceries? I discovered this completely by accident, and the difference was so dramatic that I had to share this with you immediately. Keep reading, because this will change how you think about your refrigerator forever! 𝑻𝒉𝒆 𝑬𝒙𝒑𝒆𝒏𝒔𝒊𝒗𝒆 𝑷𝒓𝒐𝒃𝒍𝒆𝒎 𝑾𝒆 𝑰𝒈𝒏𝒐𝒓𝒆. Let me ask you something. How often do you open your fridge and find vegetables that have turned slimy? Fruits that have molded? Leftovers that smell off even though you just cooked them three days ago? You throw them away, feeling guilty about the waste, frustrated about the money lost. You think maybe you're buying bad produce. Maybe your fridge isn't cold enough. Maybe you're just unlucky. But here's the truth that nobody tells you. Your food is spoiling fast because your fridge is contaminated with bacteria and ethylene gas, and 𝑦𝑜𝑢𝑟 𝑐𝑙𝑒𝑎𝑛𝑖𝑛𝑔 𝑚𝑒𝑡ℎ𝑜𝑑 𝑖𝑠 𝑚𝑎𝑘𝑖𝑛𝑔 𝑖𝑡 𝑤𝑜𝑟𝑠𝑒, 𝑛𝑜𝑡 𝑏𝑒𝑡𝑡𝑒𝑟. I used to clean my fridge the way everyone does. Once a month, I'd take everything out, wipe the shelves with regular cleaning spray, and put everything back. But my vegetables would still wilt within days. My fruits would still mold quickly. I was spending lots of money weekly replacing spoiled food. Then I met someone who worked in commercial food storage, and she told me something that completely shocked me. She said, "𝑌𝑜𝑢'𝑟𝑒 𝑛𝑜𝑡 𝑐𝑙𝑒𝑎𝑛𝑖𝑛𝑔 𝑦𝑜𝑢𝑟 𝑓𝑟𝑖𝑑𝑔𝑒. 𝑌𝑜𝑢'𝑟𝑒 𝑗𝑢𝑠𝑡 𝑚𝑜𝑣𝑖𝑛𝑔 𝑏𝑎𝑐𝑡𝑒𝑟𝑖𝑎 𝑎𝑟𝑜𝑢𝑛𝑑." That conversation changed everything. 𝑻𝒉𝒆 𝑴𝒆𝒕𝒉𝒐𝒅 𝑻𝒉𝒂𝒕 𝑪𝒉𝒂𝒏𝒈𝒆𝒔 𝑬𝒗𝒆𝒓𝒚𝒕𝒉𝒊𝒏𝒈. Here's what I learned. Regular cleaning sprays don't kill the bacteria that cause food to spoil. They just spread them around. The correct method uses white vinegar, which is a natural antibacterial agent. Mix equal parts water and white vinegar in a spray bottle. Remove everything from your fridge. Spray every surface generously. Let it sit for five minutes. This is crucial. Those five minutes allow the vinegar to kill bacteria. Then wipe with a clean cloth. The difference this makes is extraordinary.

1 like • Feb 11
Thank you
1 like • Feb 13
@Kelly Merriman thank you
Jan 20 •
𝑹𝒆𝒎𝒐𝒗𝒆 𝒀𝒆𝒍𝒍𝒐𝒘 𝑩𝒂𝒕𝒉𝒓𝒐𝒐𝒎 𝑺𝒕𝒂𝒊𝒏𝒔 𝑾𝑰𝑻𝑯𝑶𝑼𝑻 𝑯𝒂𝒓𝒔𝒉 𝑪𝒉𝒆𝒎𝒊𝒄𝒂𝒍𝒔!
You scrub. You spray. You scrub again. 𝐴𝑛𝑑 𝑠𝑡𝑖𝑙𝑙…𝑡ℎ𝑜𝑠𝑒 𝑢𝑔𝑙𝑦 𝑦𝑒𝑙𝑙𝑜𝑤 𝑠𝑡𝑎𝑖𝑛𝑠 𝑟𝑒𝑓𝑢𝑠𝑒 𝑡𝑜 𝑙𝑒𝑎𝑣𝑒 𝑦𝑜𝑢𝑟 𝑏𝑎𝑡ℎ𝑟𝑜𝑜𝑚. On tiles, around drains, on the toilet base, in corners — they make your bathroom look old, dirty, and neglected even when you clean regularly. Many people think yellow stains mean damage or age. But here’s the truth: most yellow bathroom stains are completely removable — 𝑎𝑛𝑑 𝑦𝑜𝑢 𝑑𝑜 𝑁𝑂𝑇 𝑛𝑒𝑒𝑑 ℎ𝑎𝑟𝑠ℎ 𝑐ℎ𝑒𝑚𝑖𝑐𝑎𝑙𝑠 𝑡𝑜 𝑓𝑖𝑥 𝑡ℎ𝑒𝑚. Stay with me, because today I’ll show you how to remove yellow bathroom stains safely, naturally, and effectively — without burning your hands, choking on fumes, or damaging surfaces. 𝑾𝒉𝒚 𝒀𝒆𝒍𝒍𝒐𝒘 𝑺𝒕𝒂𝒊𝒏𝒔 𝑨𝒑𝒑𝒆𝒂𝒓 𝒊𝒏 𝑩𝒂𝒕𝒉𝒓𝒐𝒐𝒎𝒔. Yellow stains don’t appear overnight. They’re caused by mineral buildup, soap residue, body oils, moisture, and hard water deposits. Bathrooms are warm and humid, which allows these substances to settle and oxidize over time. Toilets, tiles, and grout are especially vulnerable. The longer stains sit, the deeper they embed — but that doesn’t mean they’re permanent. 𝑻𝒉𝒆 𝑩𝒊𝒈𝒈𝒆𝒔𝒕 𝑴𝒊𝒔𝒕𝒂𝒌𝒆 𝑷𝒆𝒐𝒑𝒍𝒆 𝑴𝒂𝒌𝒆. Most people attack yellow stains with strong bleach or acid cleaners. That may remove the color temporarily, but it damages surfaces, weakens grout, and creates toxic fumes. Worse, harsh chemicals often bleach the stain instead of removing the buildup underneath — which means the stain comes back even darker later. The solution isn’t stronger chemicals — it’s smarter chemistry. 𝑻𝒉𝒆 𝑵𝒂𝒕𝒖𝒓𝒂𝒍 𝑷𝒐𝒘𝒆𝒓 𝑪𝒐𝒎𝒃𝒐 𝑻𝒉𝒂𝒕 𝑨𝒄𝒕𝒖𝒂𝒍𝒍𝒚 𝑾𝒐𝒓𝒌𝒔. The safest and most effective approach uses baking soda, white vinegar, and time. Baking soda gently lifts stains. Vinegar breaks down mineral deposits. Together — when used correctly — they remove yellow stains without scratching or poisoning your bathroom environment. 𝑺𝑻𝑬𝑷 𝟏 – 𝑷𝒓𝒆𝒑 𝒕𝒉𝒆 𝑺𝒕𝒂𝒊𝒏𝒆𝒅 𝑨𝒓𝒆𝒂. Before applying anything, rinse the stained area with warm water. This softens surface residue and prepares it for treatment. Never apply cleaners to a completely dry surface — moisture helps natural ingredients work deeper.
2 likes • Jan 21
Thanks for sharing
1-2 of 2

@toni-jackson-lawrence-5667
Homeschool mom of 4. Homeschooling for 25years
Active 8h ago
Joined Dec 17, 2025
Indiana
Powered by