Activity
Mon
Wed
Fri
Sun
Jun
Jul
Aug
Sep
Oct
Nov
Dec
Jan
Feb
Mar
Apr
What is this?
Less
More
Memberships
Crust & Crumb Academy
911 members • Free
3 contributions to Crust & Crumb Academy

9d •
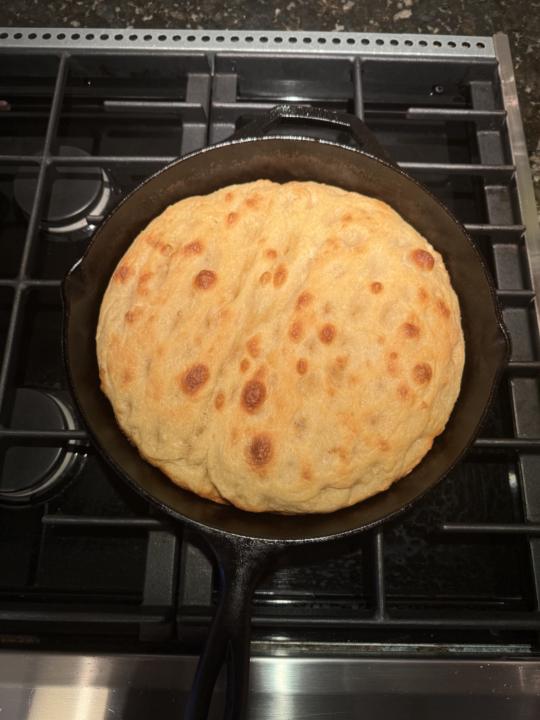
Ligurian-Style Focaccia In Cast Iron Skillet
I used Henry’s recipe for a sourdough starter. The details in his recipes are very helpful in understanding each step. I had to adapt the timing of the recipe. My normal schedule is mix dough on Sunday AM, cold retard overnight to bake on early Monday. My AI friends all suggested that would have been too long of a cold retard for this formulation. So after checking with a few different friends, I went with a room temperature fermentation of 6 hours and then stretched the dough into my well oiled skillet. The dough in the pan got a 14 hour cold retard. Early Monday I took out the cold dough and dimpled it and appied the brine and oil into the dimples. It went into the preheated oven for 30 minutes with an extra two minutes after checking to brown up the bottom. Five minutes out of the oven sitting in the pan and then to the cooling rack. We enjoyed the taste and texture. Next time I may increase the temperature a little to compensate for the cold dough. The bottom crust could also do with a few more minutes in the oven. This time I applied no toppings so will add some next time around.
2 likes • 8d
@Henry Hunter it look fine to me. We ate it all that day so I cannot check it now.

⭐
🔥
14d •
Stop guessing about bulk fermentation. Start reading your dough.
Bulk fermentation is the single most important step in sourdough baking, and it's the one most bakers get wrong. Not because they're bad bakers, but because they're relying on the clock instead of the dough. The Fermentation Compass changes that. This interactive tool tracks nine observable signals from your dough and combines them into one clear verdict: underproofed, getting close, in the zone, pushing it, or overproofed. No guesswork. No Googling. Just real answers based on what your dough is actually doing right now. Here's what it does: - Scores 9 criteria in real time: temperature, time, percent rise, dome shape, surface bubbles, side bubbles, wobble test, windowpane test, and smell - Adjusts all target ranges based on YOUR recipe (hydration, leaven percentage, flour type) so the readings are calibrated to the dough you're actually making - Displays a composite Fermentation Compass that averages every signal into a single visual readout - Color-coded status badges on each criterion so you can see at a glance which signs point to under, ready, or over - Built-in "Why this matters" teaching notes on every criterion, written to help you understand the science behind the signal - Bake Timeline that logs each check with a timestamp and 9 colored dots, giving you a full visual record of your dough's journey from mix to shape - Saves your readings automatically so you can refresh the page mid-bake without losing anything The goal isn't to make you dependent on a tool. It's to train your eye, your hands, and your nose so that eventually you don't need one.
3 likes • 14d
I tried the compass and it was very useful especially since my kitchen runs on the cold side at 65-68F. I still need to evaluate the dough for rise, movement, bubbles and such but the compass put that all in context with time, temperature and flour type.
15d •
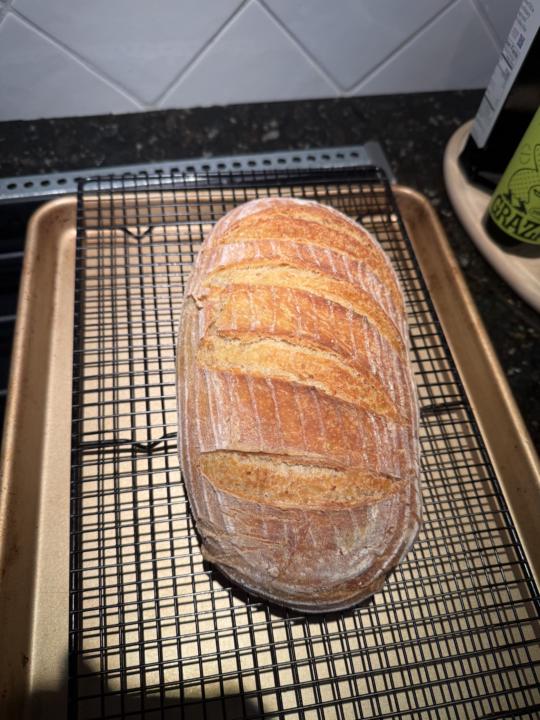
I tried a Semolina mix for my 3rd time baking
I used a detailed step by step approach to preparing, mixing, fermenting and baking. My schedule is feeding my refrigerated sourdough starter on a Friday nite, followed with a second feeding on Saturday. Mixing dough on Sunday with a cold retard overnite before baking on Monday. I used Semola rimacinata 350 g, bread flour 150 g, water 385 g, Starter 150 g, Salt 10 g, Olive oil 15g Toasted sesame 25 g folded into the dough My bulk fermentation was about 7 hours, we like a cold kitchen at about 65F. Baked in an oval preheated Dutch Oven at 475 for 20 minutes covered then 450 for 22 minutes uncovered but with oven door cracked open the last 5 minutes. Had to hide the loaf from my wife for two hours to let it cool properly. She and I both liked the semolina flavor and the sesame seeds inside were so much better than on the outside. The bread has a heavier texture than a typical sourdough loaf. I enjoyed the crust and the crumb both. They say “Semolina dough needs confident tension” Next time I plan to work on my slap and fold before bulk fermentation and my coil folds after.
3 likes • 15d
@Colleen Vergara YouTube can be your guide. I must have done a few hours watching semolina bread videos to help me walk thru the process.
1 like • 15d
@Henry Hunter thanks for catching that typo. It is 150 grams of Starter that I used. I should refrain from posting after 9 pm as my typos increase exponentially.
1-3 of 3

@jack-kerins-9558
Starter on Saturday, Mix on Sunday, Bake on Monday. Hobbyist
Active 15h ago
Joined Apr 12, 2026