Activity
Mon
Wed
Fri
Sun
Dec
Jan
Feb
Mar
Apr
May
Jun
Jul
Aug
Sep
Oct
Nov
What is this?
Less
More
Digital Success Starter
1.1k
5.0
Free
Alpha Trading Academy
290
Free
The Limitless Trading Club
263
Free
Millionaire Trading Academy
1.1k
Free
Quick Trading (Free Course)
6.4k
Free
Fully Defined
133
Free
Plasticity Pros
58
Free
The Energy Data Scientist
1k
5.0
$28/m
27 contributions to Creative 3D Community

Jun 27 •
Audi Concept C
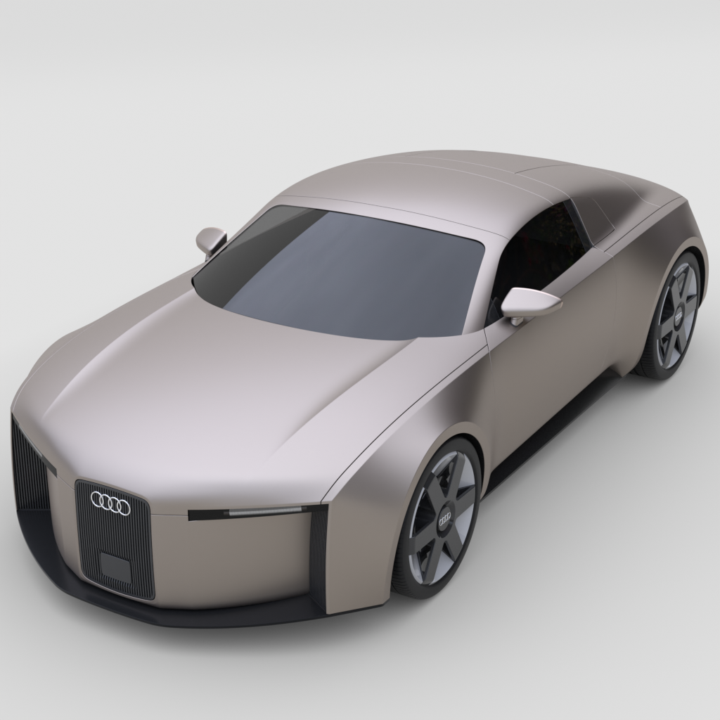
One more tutorial from Kuechmeister Swagger. Not so detailed and complex shaped as Audi E-tron however a bit faster as easier to follow. Model does not 100% correspond to original because of lack of correct blueprints and surface quality is not perfect in several places but still quit close. I would recommend the course to advanced users who want to practice Surface tool and XNurbs with different cases of usage. But keep in mind the tutorial is kinda incomplete. I mean there are some details I had to added myself from photo references so the car looks whole: black plastic grid in the front, logos, mirrors didn't corresponded to reference, bottom part absence and holes near wheel housings. The most handy references I found here https://www.netcarshow.com/audi/2025-c_concept/ Shared model: https://share.plasticity.xyz/r/1d5zp3nhkpgS_XPjG80kzYF-A8ZCAQYoSQC4ug_rqnU

1 like • Jul 23
Looks great! Had a look at the course but idk he’s using studio? That’s limited if you have indie… Also there’s music and very little narration? I definitely don’t want to listen to music while I’m studying or working unless it’s music in my playlist. Overall I don’t get why anyone would sell courses with music it’s so distracting and annoying. 🤣 Although you can definitely put music in the intro or 100% if it’s a trailer, for example the Plasticity videos are so cool with how they do the music! Definitely agree with @Vladimir de BERTREN Nikita’s courses are way better! As a beginner I much prefer in-depth analysis on how the tools work as apposed to repetitive commands I already learned
0 likes • Jul 26
@Vladimir de BERTREN

Jul 22 •
🎥[NEW YouTube Video] Advanced Organic Bottle Modeling in Plasticity
One of the questions I often get is how I approach modeling very complex organic products in Plasticity. In this new video, I walk through my complete workflow for creating an advanced bottle using the same surface modeling techniques I use on professional product designs. It isn't a beginner tutorial—instead, you'll see the entire modeling process while I explain the reasoning behind every major decision. 💡 What you'll learn - Building the base form with control curves - Creating clean G2 lofts and bridge surfaces - Modeling difficult organic openings - Smooth chamfer transitions - Using XNURBS patches effectively - My overall workflow for maintaining clean, high-quality surfaces
0 likes • Jul 23
Always looking forward to your videos! ☺️
Jul 17 •
[NEXT Plasticity Course Suggestion] - Win a 100% Discount code 🎁
I am starting to research for the upcoming Plasticity course. Feel free to share what you would like to see the course about. Fill out this form below and I will draw 2 random winners on 21th July and this person will get a 100% discount code for any one of my current courses. 👇 Fill out short form https://forms.gle/dPxgNxiRbcDsVjLZ6

1 like • Jul 17
100%
Jul 8 •
Wondering why radial menus are not setup by default?
What do you think about the radial menus? In my opinion they should be setup right out of the box, they look cool, speed up work etc. I just started building up my menu and it hasn't been intuitive, the code does not seem work well when adding new items but I'm not a computer programer so idk 🤣 I'll link to the download in the comments if anyones interested

0 likes • Jul 8
https://doc.plasticity.xyz/plasticity-essentials/radial-menu
0 likes • Jul 10
@William Bourque Yeah I did check that out but did you read the reviews on gumroad? idk I probably can't use it because I'm on a mac and some apple users are saying it's not working. My radial menu is working so far, I'm just adding a few more commands the old school way 🤣

Jul 4 •
Question about the C (cut) command
When doing the USB hub modeling we use the cut command to cut out from the top of the body. The demonstation had one create a rectangle, move it just into the body and move it off. When C is pressed it created the cut. I had to do trial and error before I got the cut to be the correct size. How does the size of cut relate to the size of the rectangle and where the rectangle is when you hit C. I'm confused as how one can get the cut just the right size?????
0 likes • Jul 5
Adjust where your viewing the object from, side view, top view etc and try the cut tool again
1-10 of 27
