
Write something
Pinned

Feb 11 •
Update: Classroom Structure & Membership
Over the past few weeks, I’ve reorganised the Classroom to make the learning pathway clearer and easier to navigate. The community, Absolute Beginners course, Q&A, Image Critique, and the Camera Basics cheat sheets remain free and open to all members. Additional courses — including Foundations, genre and technique deep dives, and the growing cheat sheet collections — now sit inside the paid membership tier. This simply separates:• free orientation and community• structured, in-depth learning for those who want to go further Nothing has been removed — the structure has just been clarified. As always, you’re welcome to stay at the level that suits you.
Pinned
Jan 31 •
Start Here
Welcome — I’m really glad you’re here. This space is called Simple, Practical Photography for a reason. It’s designed for photographers who want clear explanations and real understanding, without pressure or overwhelm. A few important things to know right away: - You don’t need to post to belong here - Reading quietly (lurking!) is completely fine - There’s no right pace — dip in when it suits you How to use this space You can explore in whatever order feels comfortable, but if you’d like a gentle starting point: - Deep Dives → longer posts that explain why things work - Genres → focused posts on different types of photography - General Discussion → anything else, questions, thoughts, or observations There’s no expectation to keep up, comment, or “be active”.This is a calm learning space, not a busy forum. If you ever feel unsure where to go next, that’s normal — just choose one thing that catches your eye and start there. I’ll add new content gradually and thoughtfully. You’re welcome to join in, or simply read along. — Helen
2
0
Pinned
Jan 12 •
Q & A — A Calm Place for Camera & Lesson Questions
This is a gentle, judgement-free space for questions that come up as you work through the lessons. If you’re unsure about: - a camera setting or button - something mentioned in a lesson - why a photo didn’t turn out how you expected - whether you’re “doing it right” … you can ask about it here. You don’t need to use technical language. You don’t need to explain what you’ve already tried. And you don’t need to apologise for asking. If your question is useful for others too, I’ll reply here so everyone can learn from it. You’re welcome to post whenever something feels unclear — even if it feels small.
Feb 24 •
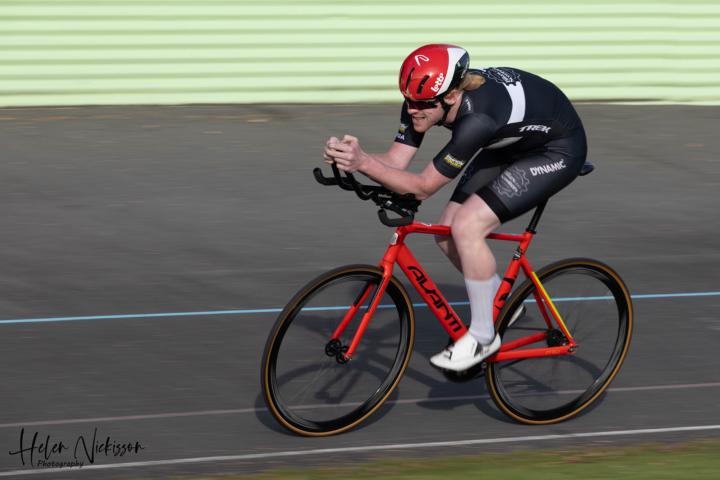
Slow Shutter for Action – Adding Motion Without Losing Control
I went to a cycling event yesterday because I needed to get back behind the camera for myself. Instead of freezing everything at 1/1000 sec, I slowed my shutter to 1/125–1/160 and panned with the riders. Just enough blur in the background. Just enough movement in the wheels and feet. But the focus? Always on the face. When we photograph action, the instinct is usually to freeze everything. Fast shutter. Sharp rider. Sharp wheels. Sharp background. But sometimes… freezing the action removes the feeling of movement. Two Ways to Use Slow Shutter in Sport 1️⃣ Panning (Controlled Motion) This is where you: - Lock focus on the rider - Move your camera smoothly with them - Press the shutter while continuing to move If you get it right: - The rider stays relatively sharp - The background streaks into beautiful motion lines That streaked background is what gives the image energy. Tip: Use continuous focus (AF-C / AI Servo) and burst mode. 2️⃣ Letting Everything Blur (Creative Motion) You can also stay still and let the riders move through the frame. This gives: - Blurred wheels - Ghosted limbs - A sense of speed and chaos It’s less controlled. But sometimes more expressive. Camera Settings to Try: For DSLR / Mirrorless users: - Shutter Priority (S or Tv mode) - Start at 1/30 sec - Adjust from there - ISO low enough to avoid overexposure For bridge or compact camera users: - Use Shutter Priority if available - If not, try “Sports” mode and manually reduce shutter if your camera allows - Some bridge cameras allow very slow shutter speeds — experiment! The Secret Ingredient: This technique involves failure. Lots of it. You might take 20 frames and get 2 that work. That’s normal. It’s timing + smooth movement + patience. Your Challenge: Next time you see: - Kids on bikes - Runners - Dogs at the park - Even cars driving past Instead of freezing the action… Slow it down. Try:1/60 → 1/30 → 1/15 And see what happens.
Mar 29 •
It’s been a little quiet from me here lately…
I’ve been a bit tied up getting a new studio space up and running (which has been both exciting and slightly chaotic 😄) But I popped in today and saw a couple of new faces joining us — so a very warm welcome if that’s you. This space has always been about learning photography in a practical, real-world way — noticing light, trying things out, and building confidence with your camera. I’ll be easing back into posting again, but in the meantime… What have you been photographing lately? Anything at all — even if it’s just experimenting.
2
0
1-30 of 46
powered by
skool.com/photography-club-pilot-group-1276
Simple, practical photography for photographers who want clear explanations, real understanding, and confidence with their camera — without overwhelm.
Suggested communities
Powered by