
Write something

Apr 11 •
🍞 Cozonac with Nutella (Romanian Sweet Bread)
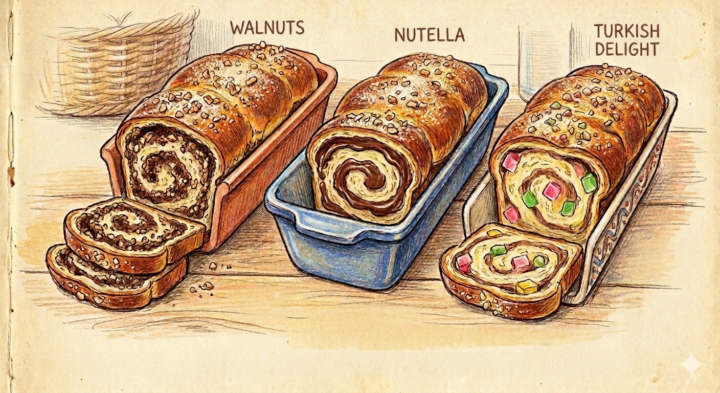
Prep time: 45 mins | Rising time: 2–3 hours | Bake time: 45 mins | Makes: 2 loaves 🛒 Ingredients For the Dough: 1kg Strong white bread flour (sifted) 500ml Whole milk (warm, not hot) 50g Fresh yeast (or 14g dry yeast) 250g Caster sugar 200g Unsalted butter (melted and cooled) 6 Egg yolks (room temperature) 1 tbsp Vanilla extract & Zest of 1 lemon and 1 orange 1 tsp Salt For the Filling: 400g Nutella (slightly warmed for easy spreading) Optional: 150g chopped walnuts or hazelnuts for crunch For the Glaze: 1 Egg beaten with 1 tbsp milk A sprinkle of raw sugar 👨🍳 Instructions 1. Activate the Yeast In a small bowl, mix the yeast with 1 tablespoon of sugar and a little warm milk. Let it sit for 10–15 minutes until it becomes foamy. 2. The Mix In a large bowl (or stand mixer), combine the flour and salt. Create a well and add the yolks, sugar, vanilla, citrus zests, and the yeast mixture. Slowly pour in the warm milk while mixing. 3. The Knead (The Secret Step) This is where the magic happens. Gradually add the melted butter while kneading. You need to develop the gluten until the dough is elastic and no longer sticks to your hands. Pro Tip: If kneading by hand, use the "fold and slap" method for about 20–30 minutes. 4. The First Rise Cover the dough and leave it in a warm, draft-free place for about 1.5 to 2 hours, or until it has doubled in size. 5. Shape and Fill Divide the dough into four equal balls (two for each loaf). Roll each ball out into a rectangle. Spread a generous layer of Nutella over each, leaving a small border. Roll them up tightly like cigars. To get that classic look, take two rolls and twist them together like a braid. Place into greased loaf tins. 6. Second Rise & Bake Let the loaves rise in the tins for another 45 minutes. Brush the tops with the egg wash and sprinkle with sugar. Bake at 170°C for 45–50 minutes. If the top browns too quickly, cover loosely with foil. 💡 Chef’s Note: Wait at least an hour before slicing! Cutting into hot cozonac collapses the airy structure you worked so hard to create.
3
0
Apr 7 •
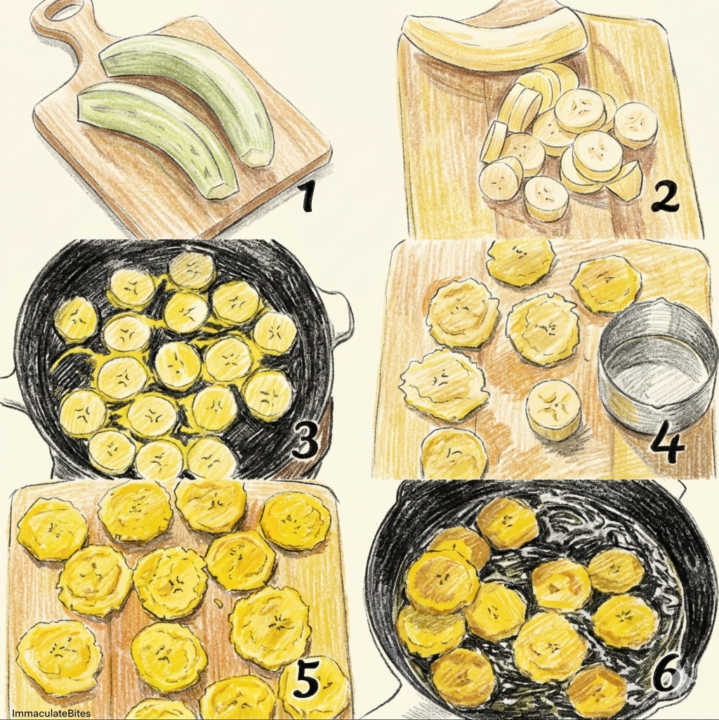
🍳 Classic Tostones (Double-Fried Green Plantains)
Tostones are the ultimate "Kitchen Passport" snack. The secret is the double fry: the first fry cooks the inside, and the second fry creates that world-class crunch. Ingredients: - 2 Large Green Plantains ( In the sketch chosenr 2 or 3) - Neutral oil for frying (Vegetable or Canola) - Sea salt - Optional: 2 cloves of mashed garlic mixed with a little water and salt. Instructions: 1. Peel & Slice: Cut the ends off the plantains. Score the skin lengthwise and peel it back with your thumb. 2. Slice the plantain into thick rounds (about 2.5cm / 1 inch thick). 3. The First Fry: Heat about 2cm of oil in a pan over medium heat. Fry the chunks for about 3–4 minutes per side until they turn light golden and soft. They shouldn't be "crispy" yet. 4. The Smash: Remove them and drain on a paper towel. While they are still warm, use the bottom of a heavy glass or a "tostonera" (press) to smash them flat until they are about half their original thickness. 5. The Flavor Bath (Optional Pro Tip): Quickly dip the smashed plantain into your garlic-salt water and pat it dry immediately. This adds an incredible depth of flavor. 6. The Second Fry: Increase the heat slightly. Fry the flattened discs again for 2 minutes per side until they are deep golden and "glass-crunchy" on the edges. 7. Finish: Drain again and hit them with a generous pinch of salt while they are still hot. 8. Serve with your favorite dipping sauceans a squeeze of lime. Chef’s Challenge: If you make these, try serving them with a simple garlic mojo or even just some fresh lime. Post a video of that "crunch" sound below! 👇🔥
6
0
Mar 30 •
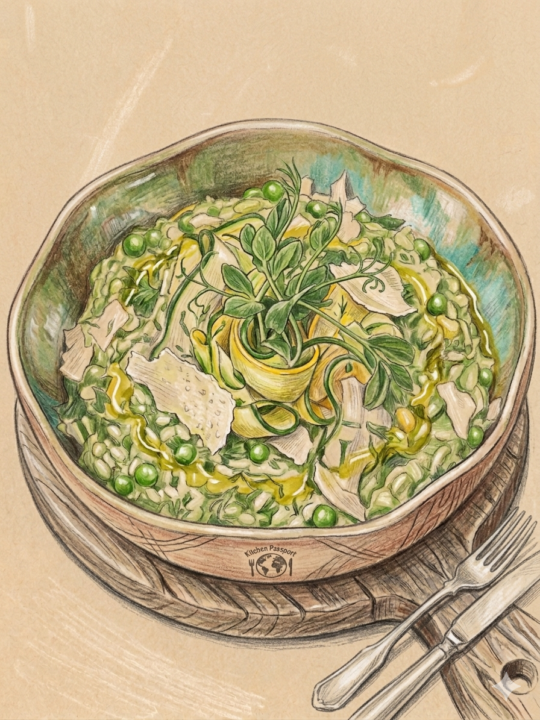
Risotto Primavera – The Green Revolution 🌿🇮🇹
Spring is on the plate today! Using the signature technique from our latest Kitchen Passport sketch, we are making a vibrant, electric-green Risotto Primavera. This dish is all about the "Second Act", taking a perfect base and transforming it with fresh, seasonal energy. The 'Green Power' Paste The soul of this dish isn't in the rice; it's in the blend. In a mixer, combine: - Green peas, fresh mint, garlic, salt, pepper, and olive oil. - Blend until you have a thick, chunky 'paste' consistency. This keeps the flavor intense and the color bright. The Assembly (Per Portion) 1. Sauté yellow and green courgette in butter for 1 minute. 2. Add 220g of our White Risotto Base and 100-150ml of vegetable stock. 3. Once the rice is perfectly cooked and the stock is absorbed, remove from heat. 4. Mantecatura: Stir in cold butter and Parmesan until silky. 5. The Secret Step: Fold in your Pea & Mint paste at the very end. Do not overcook it, you want that fresh, raw-green pop! The Presentation: Decorate with blanched courgette ribbons, Parmesan flakes, chopped mint, a drizzle of olive oil, and fresh pea shoots. 🔓 Unlock the Foundation: The Recipe Vault How did I get the rice perfectly al dente so fast? I used my Mother White Risotto Base, the same one I use in professional kitchens. I have just uploaded the full blueprint for this base (including the Bouquet Garni infusion, the wine deglaze, and the secret to giving it that silky creamy texture) into our Recipe Vault. Premium Members: You can access the "Mother Base" tutorial right now in the Vault. Not a Premium Member yet? Upgrade today to unlock my library of professional base recipes and kitchen systems that save you hours of work!
4
0
Feb 25 •
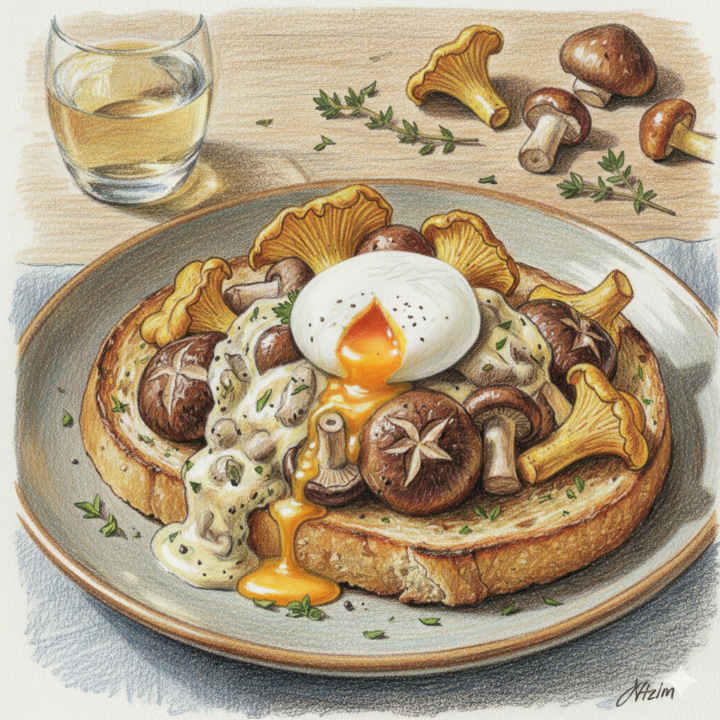
Golden Wild Mushroom Fricassee
Prep time: 10 mins Cook time: 15 mins Serves: 2-4 This fricassee is the real deal—pure, nutrient-dense, and versatile. Serve it over toasted sourdough, a bed of creamy polenta with a poachedegg on top, or even as a rich sauce for a pan-seared chicken breast. 1. The Essentials (Ingredients) The Stars: 500g Mixed wild mushrooms (Chanterelles, Oyster, Shiitake, or Porcini). The Aromatics: 2 Large shallots (finely diced) + 2 Garlic cloves (pureed or minced), and some thime (optional) The Deglaze: 100ml Dry white wine (like a Sauvignon Blanc). The Body: 150ml Heavy cream (Double cream) or Crème Fraîche. The Fats: 40g Unsalted butter + 1 tbsp Olive oil. The Finish: Fresh parsley, a squeeze of lemon juice, salt, and cracked black pepper. 2. The Method Prep the Mushrooms: Clean them with a brush or a damp cloth—never soak them in water! Tear or slice larger mushrooms into bite-sized pieces, but leave the small ones whole for texture. The High-Heat Sear: Heat the oil and half the butter in a large skillet over medium-high heat. Once the butter is foaming, add the mushrooms. Do not crowd the pan. Let them sit for 2-3 minutes without stirring so they develop a golden-brown crust. Soften the Aromatics: Reduce the heat to medium. Add the remaining butter, the shallots, and the garlic. Sauté for 2 minutes until the shallots are translucent and sweet. Deglaze the Pan: Pour in the white wine. Use a wooden spoon to scrape up all those flavorful brown bits (the fond) from the bottom of the pan. Let the wine reduce by half. Build the Sauce: Pour in the cream. Simmer gently for 3-5 minutes until the sauce thickens enough to coat the back of a spoon. The Final Polish: Stir in the fresh parsley and a squeeze of lemon juice (the acid cuts through the richness of the cream). Season generously with salt and pepper.
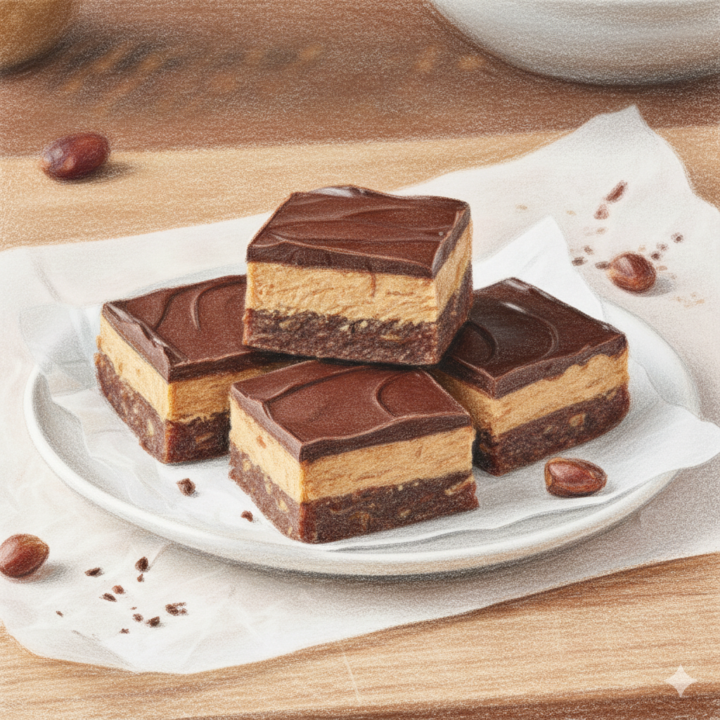
Feb 17 •
No-Bake Chocolate Peanut Butter Fudge Bites
Prep time: 15 minutes Chill time: 30-60 minutes Yields: 16-20 squares Ingredients: 250g dark chocolate (70% or higher, for that real kick!) 200g natural peanut butter (the kind with just peanuts and salt, no added sugar or oils!) 250g pitted dates Instructions: 1. Prep the Base: In a food processor, blend the pitted dates until they form a sticky, dough-like ball. 2. Form the Base: Press the date mixture evenly into a parchment-lined 8x8 inch (20x20 cm) baking dish. Use a rolling pin or the back of a spoon to get it really compact and smooth. Place in the freezer while you prepare the next layer. 3. Melt the Peanut Butter: In a small saucepan over low heat, or in a microwave-safe bowl, gently warm the peanut butter until it's smooth and easily spreadable. 4. Layer the Peanut Butter: Remove the date base from the freezer. Evenly spread the warmed peanut butter over the date layer. Return to the freezer. 5. Melt the Chocolate: Break the dark chocolate into pieces and melt it in a double boiler or in a microwave-safe bowl in 30-second intervals, stirring until smooth and glossy. 6. Top with Chocolate: Pour the melted chocolate evenly over the peanut butter layer. 7. Chill & Set: Place the dish back in the refrigerator for at least 30 minutes (or freezer for 15-20 minutes) until the chocolate is fully set. 8. Slice & Serve: Once firm, remove from the dish using the parchment paper. Slice into squares and enjoy! Store in an airtight container in the fridge.
3
0
1-9 of 9
powered by
skool.com/kitchen-passport-1509
From the world's kitchen's to the family tabel.
Learn global chef secrets and professional techniques, adapted for quick and flavourful family meals
Suggested communities
Powered by