

11d •
Giveaway for Solopreneurs and Owners!
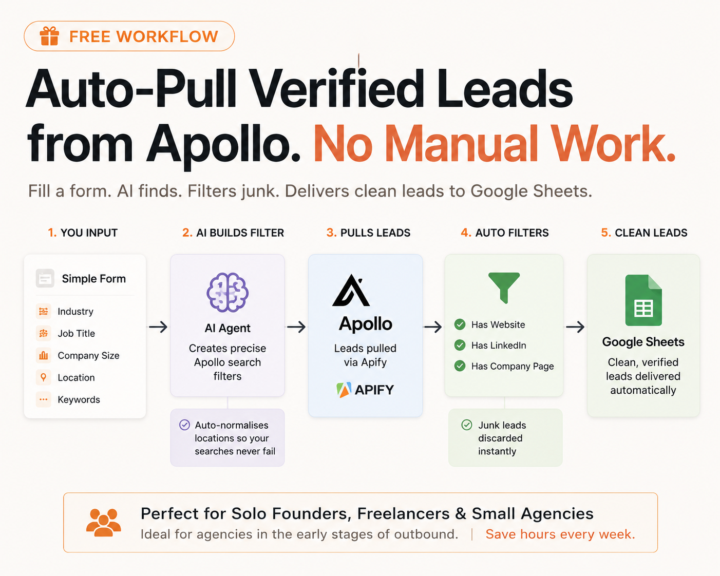
I'm giving away the exact workflow I use to pull verified leads from Apollo for free Most people building outbound systems waste hours sourcing leads and cleaning bad data manually. So I built a workflow that does it automatically. Here's what it does: → You fill out a simple form (industry, job title, company size, location, keywords) → An AI agent converts your inputs into a precise Apollo search filter and automatically formats locations correctly → It pulls matching leads directly from Apollo → Leads without a website are removed → Leads without a LinkedIn profile are removed → Leads without company information are removed → Clean, verified leads are sent straight into Google Sheets with name, email, phone number, title, company, industry, LinkedIn URL, and website No manual filtering. No messy CSV exports. No wasting time checking whether a lead is worth contacting. This workflow is especially useful for: • Solo founders • Freelancers • Small agencies • Teams doing under 50 outbound conversations per day If you're still manually building prospect lists, this will save you hours every week. This is one small piece of the AI outbound systems I build for marketing agencies. The goal isn't finding more leads. The goal is to remove manual work from the lead generation process. Want the workflow? Comment Leads, I will send it to your DM!
2
0

15d •
[FOR HIRE][REMOTE] Full-Stack & AI Engineer || 9 Years of Experience
Expertise: AI agents and agentic workflows, voiceAI and conversational AI, SaaS, multi-tenant platforms, RAG systems and LLM applications, workflow automation and API integrations, OCR and document intelligence, blockchain (smart contract, DeFi, trading bot) etc Stack: python, FastAPI, node.js, react, next.js, typeScript, OpenAI, n8n, make.com, OpenClaw, OpenCV, LangChain, PostgreSQL, MongoDB, Docker, kubernetes, AWS Portfolio: https://suzi-omega.vercel.app Available for full time/ contract-based work
1
0
16d •
[FOR HIRE][REMOTE] Full-Stack & AI Engineer || 9 Years of Experience
Expertise: AI agents and agentic workflows, voiceAI and conversational AI, SaaS, multi-tenant platforms, RAG systems and LLM applications, workflow automation and API integrations, OCR and document intelligence, blockchain (smart contract, DeFi, trading bot) etc Stack: python, FastAPI, node.js, react, next.js, typeScript, OpenAI, n8n, make.com, OpenClaw, OpenCV, LangChain, PostgreSQL, MongoDB, Docker, kubernetes, AWS Portfolio: https://suzi-omega.vercel.app Available for full time/ contract-based work
1
0

27d •
One tool I wish I had started with from Day 1 → Typeform
When I first got into AI automations, I kept running into the same wall: my workflows needed a reliable, beautiful way to collect data from users. That's when Typeform became a non-negotiable in my stack. Here's the thing most people don't realise: ✅ Make.com connects to it natively ✅ Zapier has dedicated Typeform triggers ✅ n8n, Pabbly, and most other automation platforms do too ✅ It integrates seamlessly with AI tools like OpenAI & Notion Typeform is basically the front door to most serious automation pipelines. Every lead capture, intake form, quiz funnel, or client onboarding workflow I've built, Typeform has always been the starting trigger. I've developed AI automation tools on top of it, and all I can say is that this is becoming a consistent income stream for me. If you're serious about building automations (or selling them), you'll need this. The free plan is limited, the paid plan is where the real power is: more responses, logic jumps, integrations, and webhooks. 👇 Sign up using my link below and let's build together: https://typeform.cello.so/vQOdJJ1kLD7 Drop a 🔥 in the comments if you're already using Typeform or planning to.

May 28 •
ng for an AI Automation Expert (Co-Founder/Equity Basis) for a Launched AI Startup
Hey everyone! 👋 I have recently launched ovrHEALTH AI, an AI-powered healthcare application designed to process patient symptoms and reports, converting them into easy-to-understand information. As we are scaling fast and building a highly engaging community, I am looking for a talented AI Automation Expert (n8n, Make, OpenAI/Claude APIs) to join forces with me. Since we are in the early scaling phase, this is NOT a fixed-salary job. Instead, I am offering shares/equity in the company. You will be joining as a core tech partner, meaning as the company grows, we win together. What I am looking for: • Expert-level knowledge of AI Automation workflows (especially n8n). • Ability to connect social communities (like Facebook/Discord) with AI models and databases. • A hustler mindset who believes in leverage, digital transformation, and building long-term brand identity. If you are passionate about AI, healthcare innovation, and want to own a piece of a promising AI startup, let's connect! Drop a comment below or send me a Direct Message (DM) with a brief summary of your past automation projects. Let's build something big together! 🚀
1-30 of 37
skool.com/data-and-ai
For operators and builders who want to actually profit from AI — not just learn about it.
Leaderboard (30-day)
1

🔥
+17
2

+9
3

+8
4

+7
5

+7
Powered by