Activity
Mon
Wed
Fri
Sun
Nov
Dec
Jan
Feb
Mar
Apr
May
Jun
Jul
Aug
Sep
What is this?
Less
More
Memberships
CoinPicks Genesis
1.6k members • $1/m
Trading Accelerator
242 members • Free
15 contributions to Trading Accelerator

Sep '23 •
Module 6: Basics of Market Structure
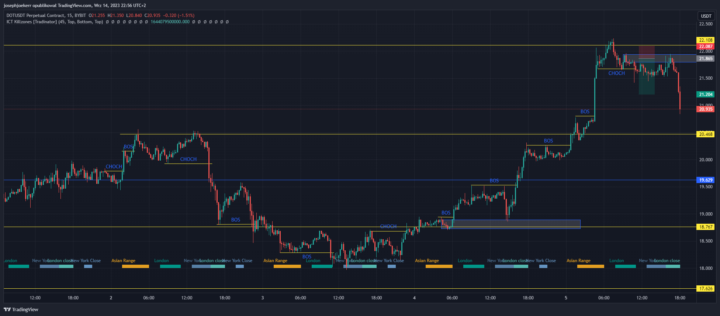
Took me a long time my kids were sick so i needed to take week off of TA but i'm back, did as much as i could during my absence days. Back to business then: Well this was fun 😁😉, have to admit i hated this module in the beginning, was literally pain in the bum for me lol, but it turned out to be one of the best modules so far, as i always has mention in my previous homework i have tendency to loose focus for some reason during those tasks 🤷. This module actually make me use my brain cells and focus much more on the chart, and finding trend direction, market structure, as they say "trend is your friend" 📈📉. Did 24 trades 15 win, 9 loss, Total R 43.7 ,cumulative R 37.0 WR 62,5% calculator there shows 26,32% for reason Looking at my trades can tell my skills definitely got much better since i got here, the only thing for sure is i do jump in to trades more confident on back test mode than i do in live trade at the moment, in the beginning of my trading i was more "confident" than now, lost a quite a bit of money and that holds me back big time sometimes, some traumatic stuff i guess lol that's one thing i definitely need to work on. Overall module 6 great stuff definitely that was something totally new for me to learn. Few of my trades below: Bare in mind some of entries would be done manually( as where i would like to jump in to trade using limit or market buy) as watching the price action. Those should be easy to spot for those who r interested. 1st Photo: That's how my chart looks like i took all of my trades on DOT/USDT 2nd Photo: Actually took 3 or 4 trades, while it just could of been one :) but to defend myself all my trades were 1:3 R 3rd Photo: That's on of the trades i would jump in to position manually ( read above what i mean manually) 4th Photo: Need to show my losers as well, valid trade but got stopped out tight stop loss 1:3 5th Photo: This set up was buy limit placed it in the middle of the OB around 0.5 Fib, That trade would take 1D 16 H before hitting target.

1 like • Sep '23
WOW MAN ! Total R 43.7 ,cumulative R 37.0 Great stuff !
1 like • Sep '23
@Tomasz Wyszynski Came from hollidays. I am on module 5 and 6. Thnx for the nudge ! 🤗

Sep '23 •
Gaming Coins
Hey hey everyone. I know many are interested in this topic and I apologize if I missed an earlier thread on this, but like many I am watching a variety of these coins on the premise that these companies have the best use case for their coins. I realize this can be argued by defi, etc. but the sheer numbers that will buy these coins to play games via the right company/product could be great investments both long term and day trades. If anyone has any gaming coins they truly like, I'd love to hear about them in this thread. I do ask please do not shill crap coins, but companies you think could legitimately explode in the next run with excellent games/NFTs/products etc.. Putting my $ where my mouth is, I personally like GALA PYR PRIME DUBBZ and possibly WAGMI. I've also liked RLB for a while now. I'm trying to find coins at around the 50 million cap area (they are at 450 mil I think) but I think their overall product of NFT's and a trading platform will be key parameters for future companies in this space. I'd love to hear any thoughts from the community - all the best!
1 like • Sep '23
I am here for freedom, lifestyle and family. I just want to make some money. Hence my philosophy - Do not hate them, do not date them, just TRADE them; by cry.rev

Sep '23 •
Binance fud? What are you doing
All this binance fud this week.. what are you guys doing. I acctully do trust cz. But i think this time its gonna be overwhelming. I m not holding whats worth getting a hardware wallet .. And im not on binance US. You guys what are you doing, who is still on binance who left?
0 likes • Sep '23
Not only i got rekt on Ftx, i got rekt on LUNA - STABLE COIN. I knew about exchanges, i knew about shitcoins, but(t) I did not know that stable coins are NOT STABLE, hence I did not have any stop loss-es, couse I thought that price should not vary so much. Learned my lesson. 1.) only trade with what are you willing to loose. 2) liquid only for trading. 3) allways using stop-loss , even on STABLE COINS, couse they are not that stable.4) never trust anyone with your money, especialy not exchenges
1 like • Sep '23
oh, and sure- I ALSO USE HARD STORAGE (cold) wallet.

Aug '23 •
Hello everyone!
Hi to all! I'm Ave, from Croatia :) 30 years old. Never traded before, got an invite for the Trading Accelerator and luckily got into the community at the right time as my job expires in 10 days so I can put the extra hours this. Will try to be more active in the upcoming days. Also sorry for the "late" sign in. 😁
1 like • Aug '23
dobrodošla u grupi ! sve dobro

Aug '23 •
Module 4: Part 1 & 2 My Trades
Great lesson!! Took me a little too long to finish these two up. Did way more back tests than I have there, just kept forgetting the screenshots, so I had to start all over. Tradingview can be quite the little you know what sometimes. Got a few right and a few wrong, but very pleased with the results. Definitely learning a new way of seeing the markets. I will have to commit to doing two or three extra everyday just to get better. I need more practice in my own opinion and I feel unsure of where to place a stop most times. Anyways, good to see everyone else's progress in here. https://docs.google.com/spreadsheets/d/1fj_IRDO_HqdMNUXZbreE3maKYTt9pwTBWohTiFrysM4/edit?usp=sharing https://docs.google.com/spreadsheets/d/1bNdpD12_ps9fL8rbO4IRU8eK2WkzLAhiqMCf2lDkDdM/edit?usp=sharing
2 likes • Aug '23
i would kindly ask 4 access, if you would not mind, couse I have quite a lot of problems with this homework
1-10 of 15
Active 28d ago
Joined Aug 5, 2023
Powered by