Activity
Mon
Wed
Fri
Sun
Jul
Aug
Sep
Oct
Nov
Dec
Jan
Feb
Mar
Apr
May
Jun
What is this?
Less
More
Owned by Aaron
Auto painting made simple. Learn pro techniques, share projects, and level up your skills together.
Memberships
23 contributions to Make it Match

18h •
Guitar builder looking to learn
Hi, I'm Dan I recently found your excellent youtube channel when searching for information on how to properly paint with automotive urethane. I'm a guitar builder, switching from nitrocellulose to these auto paints, quite a different animal! Currently experimenting with Tamco stuff, setting up a proper spray booth/and gear.

0 likes • 16h
How cool! The biggest shift as far as switching from nitrocellulose to urethane is really just following recoat windows and making sure you have adequate ventilation and PPE. Looking forward to seeing your projects - welcome 😎

6d •
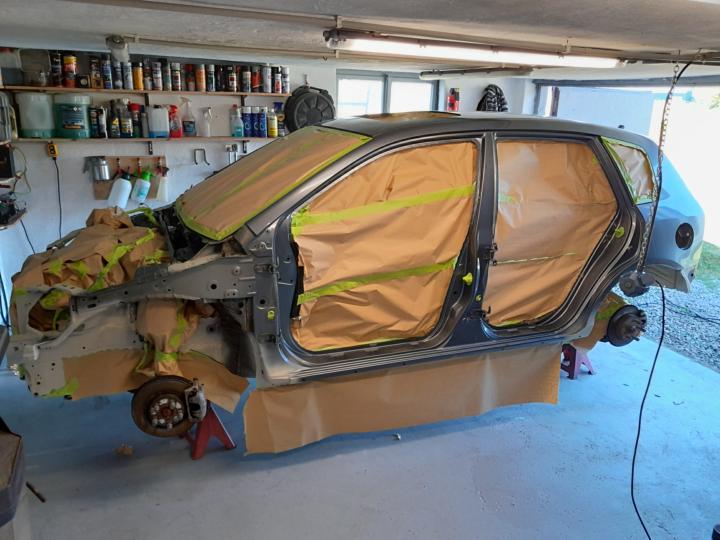
Repainting my 2005 Honda Civic
Currently i'm preparing my '05 Civic for fresh paint. The desired paint is Honda B518-P Midnight Blue Pearl. This is my first full paint job. Did some bumpers, a tailgate and some quarter panels before. This is definetly my most serious undertaking of this kind until now. It's a ridiculous amount of labour. But in the end it will be worth it 😊 @Aaron Jokela thanks for this course. It's a real gamechanger for me! Helps a lot!
1 like • 5d
Wow! That looks like a fun project! Looks great so far, good luck with everything 😎

8d •
Question on booth lighting
I am working my way through the classroom modules. I don't have my booth built yet, but I have a plan. I've got a dozen 2x4 ft LED flat panel lights ordered from Home Depot that I plan to use for lighting (5000K, 7800 lumens). My booth will be 12x24 ft, so I was thinking of putting 4 lights vertically on each side, 2 longways on top, and one horizontally on each end, at a 45 degree angle up tight to the ceiling. Does that sound light it would work? Any and all suggestions appreciated. Also, in the tutorials, it was mentioned, "Make sure that your side lights are positioned at 20-40° angles, so defects create shadows you can actually see." Does that apply to flat panel lights, too, or am I overthinking things, as I tend to do? Thanks.
0 likes • 7d
You're on the right track! The important part here is to have side lights. Most of the problems come around when you only have overhead lights and thus the sides of the project are shadowed and you can't see well as you work. I'd start with what you have planned, and then adjust as needed. You might find that what you've ordered is perfect!

22d •
My first painting project
Hi to all. I am beginner in the automotive painting world which I challenge my self to complete my project car and paint myself. I bought the Volkswagen Caddy with a light front collision damage which I replaced the front bumper, sidewings, hood and it’s a different colour which I need to paint it silver colour which I learned that is most difficult, but I don’t give up from this challenge and start to learning on Internet and on YouTube and recently joined this community to learn more about painting from the professionals like you and I hope I will get very good tips how to do my first painting job and I hope will be great. I bought the one cheap spray gun from Temu I believe is copy from DeVilbiss GTI pro lite with TE20 cap. I bought the silver colour and clearcoat. I try first paint on the damage hood. The paint come very rough, is feel like a sandpaper. I belive my paint mix was not so good as well the pressure setting was the problem. My second attempt was much better but still the base colour was more rough than the original. Is good I have test panels where I can learn and compare the colours.

3 likes • 22d
Welcome! 🙌 And what a great first project to cut your teeth on. Taking on a full color change to silver is no joke, so seriously, respect for diving in and not giving up. First off, you're doing exactly the right thing by working on test panels before you commit to the car. That's how I learned to do it, and it's going to save you so much paint and frustration. You're already on the right path. At first glance, that rough sandpapery base sounds like your reducer might be flashing too fast. When that happens, the metallic flakes basically dry in the air before they hit the panel and they "stand up" instead of laying down flat, so you get that dry, gritty texture instead of a smooth silky finish. Of course, that assumes your substrate is sanded nice and smooth with P400 and sealed with a quality 2k urethane sealer before the base goes down. Slowing your reducer down a grade (or going to a slower temp reducer for your conditions) will let the metallic settle down the way it should. Getting your air pressure and mix dialed in will help too, like you already suspected. Definitely go check out the basecoat module in the course, there are a ton of great tips in there specifically for getting metallics to lay down right. It'll click fast once you see it. Keep posting your test panels, let's get this Caddy looking awesome 🔥
0 likes • 8d
That looks spot on (at least from the photos)! I'd start with painting the front end parts, and then bolt it all together and see if it matches. Face and flop are tricky to get right with silvers like that, especially with a silver that leans more towards the blue side of the spectrum. If it doesn't match perfectly you may need to do a basecoat blend on the doors to make it perfect, but from what I see, it's very close. Great job!

12d •
Paint booth floor exhaust and water drainage
Does anyone know if paint booths that exhaust through floor grates typically have a water drain integrated into the lowest point of the exhaust pit as well? Are there paint booths where you can rinse down the floor, or possibly even the walls, with a water hose? I’m trying to plan my booth and have limited knowledge of how some of the higher-end, permanent setups are designed and built.
0 likes • 11d
Great question! Most booths aren't built with drains since exhaust systems run under negative or positive pressure, and having that constantly pulling or pushing on a line connected to a sanitary sewer isn't a great idea. (Plus most places won't let you send paint-laden rinse water down a sewer anyway, at least where I'm at) There are basically two schools of thought for downdraft booths: basement or grade designs. Basement means the floor is raised on a truss system. You drive up a ramp to load in, and air flows through a chamber underneath the vehicle. Grade means all the ductwork is under the slab, so no ramp is needed to enter the space. Both have pros and cons. Most notably, a business in my area didn't have proper drainage on their lot, and during heavy rain, groundwater would migrate into the exhaust ductwork under the booth and fill it with water. Needless to say, that setup caused a lot of problems. If you go the grade route, get your site drainage sorted before anything else. I personally haven't seen a water pit or drain integrated into a design. They may exist, but my booth is fully sealed. I just spend the day pressure washing and cleaning up the mess with a shop vac. Time consuming, but it works fairly well. If you want to cut that down, a peelable booth coating and changing exhaust filters early keeps most of the mess from ever reaching the sub-floor.
1-10 of 23