Activity
Mon
Wed
Fri
Sun
Oct
Nov
Dec
Jan
Feb
Mar
Apr
May
Jun
Jul
Aug
Sep
What is this?
Less
More
Make it Match
290 members • Free
15 contributions to Make it Match

18d •
Inner panels coating and finishing
I am looking closely at finishing off the internal cavity areas of my car body. I'd like to get feedback on what other people are doing in this regard and what products they use. I found a lot of info on what layer process should be used for the external finishing but internally things are not as clear.... I have given the insides of the body panels 2 coats of PPG epoxy primer. After scuffing with a red scotchbrite I was going to apply 2 or 3 heavy coats of uPol Gravitex. This would be applied to the insides of just about anywhere I can get to (inside rear quarters, inside door skins, pillars, front fenders), most of these areas would not get any other paint applied. However, areas that get seen such as inside the rear quarter panels (in the trunk area), would get colour/clear finish on top. So please share what you found works, what is best practice and products are junk and what works for you. Thanks,

0 likes • 12h
Admittedly, I’ve only done this once so far, but I followed the layering sequence specified by the factory—it’s described here: https://www.skool.com/makeitmatch/iterior-of-the-body-1 https://www.skool.com/makeitmatch/interior-of-the-body-2 After that, I cut and fitted the soundproofing materials that there over the paintwork.
12h •
Surfacer
Six months is enough time for the body filler to collapse to its final size, and making it ready for block sanding. Unfortunately, I didn't take photos of this process or of the application of the second epoxy primer coat. Before the second layer paint, the full body was sanded down using 120-grit Mirka autonet mesh. The second epoxy coat was allowed two weeks to cure fully, after which the entire surface was sanded with 320-grit autonet. I sprayed the surfacer (filler primer) over this sanded layer. PPG specifies a "G6" shade of surfacer for the official color (431/A), however, I knowing my car's original color, I know that shade too dark—it made the blue visible only in direct sunlight. So, after spraying test cards, I decided to go one shade lighter (G5). This was also convenient because I didn't have to mix two shades together, I could use the off-the-shelf shade directly. I applied the surfacer using an Auarita 898-2 LVLP spray gun with a 1.8mm nozzle. I had to increase the pressure slightly to around 2 bar, as 1.6 bar didn't provide sufficient atomization for that high flow rate. Next step is glue the windscreen and back window (tomorrow, I prepared the surface with color and topcoat on windshield frame last week). Then I continue with color.
0
0

13h •
Primer on body
The past three days have been a bit hectic, but I’m trying to keep my promise. For now, here are the next two parts; the rest will follow as things progress. Since I know you aren't interested in the painting of suspension and brake components, I’ve skipped that part—let’s jump straight to the exterior bodywork. The car had been repainted several times over its lifespan; I counted four pair layers (base and topcoat) in total while sanding. I sanded every panel (except for the doors and bumpers, which are being painted separately) down to the bare metal or the original factory primer layer. For this, I used a Milwaukee 12V DA sander with a Mirka Autonet 120-grit abrasive mesh. Naturally, I had a dust extraction system connected while sanding; my garage is small, so I can't afford to have everything covered in dust. After the sanding was complete—and before painting—came the degreasing stage. I refuse to let water near exposed iron, so I used isopropyl alcohol for this step. The first coat was the previously mentioned epoxy primer, the same one I used on the underbody, applied with the same Auarita K-400 gun (using a 1.7mm nozzle). Then came some body filler to smooth out minor imperfections, followed by a six-month wait. More on that in the next part.
0
0

9d •
Interior of the body 2
The next step after priming is to restore the interior soundproofing elements, and then to perform the factory interior coloring. The car originally received an interior paint that matched the exterior color of the body, which was restored. It is important to note that the paint did not originally receive a top coat. So painting with a base color would have been the right step. PPG offers a solution for this by strengthening the base color with a maximum of 10% hardener if necessary. However, for me, this protection I thought was not enough, so I chose an unconventional solution that has not been documented anywhere before. PPG's Deltron 880 MS topcoat is normally mixed in a 4:2:1 ratio. It uses the same hardener and thinner as Deltron BC (basecoat). The mixing ratio of the base is 1:1. However, during the topcoat mixing, it can be changed with different additives, for example, with a matting additive. In extreme cases, up to 50% additive can be mixed. I thought that if I mixed the basecoat material instead of the matting or elasticizing additive (which is based on the same chemistry), I would get a mixture that had the right color and coverage, but also retained the protective ability of the topcoat. Accordingly, I mixed the mixture of 3 parts varnish, 4 parts base, 1 part hardener, 1 part thinner and sprayed it with an Auarita 989-2 LVLP gun. I set the pressure and other parameters according to the viscosity of the topcoat. The coverage was good, the final result can be seen in the pictures below. Unfortunately, there was one place that flowed, but on such a large surface, I don't feel that only one single mistake is catastrophic.

1 like • 9d
@Joseph Hansen It's going to be hard work. The interior of the car is not made up of flat surfaces where it's easy to sand the paint off with a DA sander, but a million tiny dents and holes. I would try washing it with solvent (it works for 1K) and if that doesn't work then I would just roughen the parts where it sticks properly, not sand it down to the metal.
0 likes • 5d
Of course, if you have the time and determination—and want to achieve a perfect finish—you can completely remove the old paint from every single spot. You will need these two items only: https://www.amazon.com/dp/B0FLKG9751?ref=clp_cat_related_p_4&th=1 https://www.milwaukeetool.com/products/details/m12-variable-speed-polisher-sander/2438-20

May 31 •
My first painting project
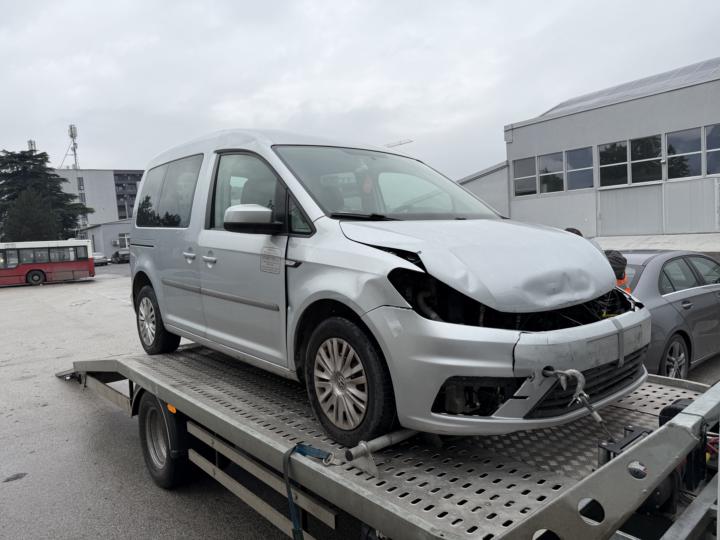
Hi to all. I am beginner in the automotive painting world which I challenge my self to complete my project car and paint myself. I bought the Volkswagen Caddy with a light front collision damage which I replaced the front bumper, sidewings, hood and it’s a different colour which I need to paint it silver colour which I learned that is most difficult, but I don’t give up from this challenge and start to learning on Internet and on YouTube and recently joined this community to learn more about painting from the professionals like you and I hope I will get very good tips how to do my first painting job and I hope will be great. I bought the one cheap spray gun from Temu I believe is copy from DeVilbiss GTI pro lite with TE20 cap. I bought the silver colour and clearcoat. I try first paint on the damage hood. The paint come very rough, is feel like a sandpaper. I belive my paint mix was not so good as well the pressure setting was the problem. My second attempt was much better but still the base colour was more rough than the original. Is good I have test panels where I can learn and compare the colours.
0 likes • 6d
I think something is wrong. You have 100 with 8 bar, this is 800 liter air. Air consumption is 360liter (12.7cfm) for TE20 cap at 2.0 bar (29 psi) per minute (see attached picture from tech data) so you need to have 1:40 minutes before the pressure reach 2.0 bar in the tanks. And I didn't calculated with the compressors which are on at 6.0 bar and start filling with 20 cfm (more than your air consumption). Excuse me, but 7 sec is incredible for me without a big gap.
0 likes • 6d
I think I’ve found the issue... :) 1.) It would be best to use a diaphragm regulator, though it should work without one too. 2.) Having the tank valves fully open is correct so far. However, to set the gun to 2 bar, you need to do the following: do not attach the paint cup, open the fan control to your intended working width, pull the trigger all the way back, and adjust the airflow to 2 bar. Then, attach the cup, pull the trigger just until you feel a slight resistance (so only air comes out), and check the pressure. With this setup, it should run for at least a minute and a half; if the compressor kicks in, I’d estimate 3–4 minutes. If that’s still not enough, you can try closing the gun’s airflow reduction valve a bit and simultaneously reducing the fluid flow. You should test this on a sample surface before painting—spraying a little onto the wall—to properly adjust the spray pattern.
1-10 of 15
@jaborszki-csaba-2012
I am renovating my previous car, an Alfa Romeo 155, into an oldtimer, which involves painting the body and other parts.
Active 30m ago
Joined Aug 29, 2026
Europe/Hungary
Powered by